Fluffy Buttermilk Biscuits with Irresistible Honey Glaze
Indulge in the best Bake Buttermilk Biscuits with Sweet Honey Glaze! Soft, flaky, and perfect for breakfast or brunch. Discover easy baking tips inside!

- look into into Homemade Heaven with Fluffy Buttermilk Biscuits with Sweet Honey Glaze
- A Touch of History and Modern Flavors
- Why You Need These Biscuits in Your Life
- The Perfect Biscuit Awaits
- Essential Ingredients Guide for Fluffy Buttermilk Biscuits
- Professional Cooking Method for Baking the Perfect Biscuit
- Pro Tips & Secrets for Baking Buttermilk Biscuits
- Frequently Asked Questions
- Recipe Card
look into into Homemade Heaven with Fluffy Buttermilk Biscuits with Sweet Honey Glaze
Oh my gosh, i remember the first time i tried making buttermilk biscuits from scratch . it was a rainy saturday, and i was holed up in my kitchen, channeling my southern roots.
Honestly, i was feeling a little fancy and thought, “why not whip up some homemade buttermilk biscuits ?” spoiler alert: it was one of the best decisions i ever made.
I mean, who can resist that warm, flaky goodness drizzled with a sweet honey glaze ? these biscuits literally brought my kitchen to life.
They danced right off my baking sheet and straight into my heart, making me wonder why i ever thought baking was too hard!
So, if you’ve ever found yourself longing for that cozy, comforting taste of southern baking traditions , you’re in the right place.
You can soon bake buttermilk biscuits with sweet honey glaze that'll make you feel like a pastry chef without all the fuss.
And the best part? this recipe is super easy and doesn’t require any special skills. trust me; if i can do it, so can you!
A Touch of History and Modern Flavors
Let’s unpack a bit about how these delightful biscuits became a staple in our southern comfort food repertoire. originating from the heart of the south, classic biscuits were traditionally made by hand and often enjoyed with breakfast or as a side dish.
Today, they stand proud as a breakfast staple across america, especially enjoyed with warm syrup or alongside savory dishes.
Now, you might be wondering how long this whole endeavor takes. the prep is a breeze, taking about 15 minutes of your time, plus a short 10 minutes of chilling .
After that, a quick 15- 20 minutes in the oven will yield about 12 of the fluffiest biscuits that your family and friends will rave about.
Oh, and the cost? it’s pretty wallet-friendly too—what’s not to love about making something delicious on a budget?
Why You Need These Biscuits in Your Life
Let’s chat about the key benefits of these biscuits, shall we? first off, they’re not just delicious; they also pack some nutrition reminiscent of good, hearty southern comfort food .
Buttermilk is packed with calcium, and when you throw in a drizzle of that honey glaze , you just elevate everything to a new level of yumminess.
And here’s the kicker: these biscuits are versatile! whether you’re serving them for brunch, breakfast, or even dinner, they fit any occasion.
Think about it—who doesn’t like a warm biscuit alongside a hearty soup or a plate of fried chicken? plus, they’re a hit with kids! you know, i’ve used these as a base for breakfast biscuit ideas —slap on some sausage and cheese, and voila! breakfast sandwich goals achieved.
What’s even cooler is that these biscuits can be customized to suit your mood. feeling fancy? go for cheddar chive biscuits .
Want a savory twist? try some herb-infused biscuit variations . you could even drizzle maple syrup on top instead of honey—talk about options!
The Perfect Biscuit Awaits
So, how do you get started on this delightful journey? well, the next section lays out the ingredients you'll need.
Let me tell you, once you discover the joys of baking perfect biscuits , you won't be able to keep from showing off your skills to friends and family.
Grab those measuring cups, preheat your oven, and prepare to impress. we’re about to whip up something special—trust me, these biscuits will be the showstopper of your next meal!
Essential Ingredients Guide for Fluffy Buttermilk Biscuits
When you're about to bake buttermilk biscuits with sweet honey glaze , knowing your ingredients is key to mastering that fluffy texture and mouthwatering flavor. So, let’s talk ingredients!
Premium Core Components
First off, let’s get into those core ingredients :
- All-purpose flour : You’ll want about 2 cups (240g) . Make sure it’s fresh; you don’t want expired flour messing with your fluffy biscuit ambitions!
- Baking powder and baking soda : These are your leavening heroes. Stick to 1 tablespoon of baking powder and 1 teaspoon of baking soda for that perfect rise.
- BUTTER : Use ½ cup (113g) of chilled, unsalted butter. The colder, the better. Cold butter = flaky perfection. I mean, who doesn’t want that?
- Buttermilk : ¾ cup (180ml) gets in the mix. It’s what really lends those biscuits that soft and tender consistency we’re after.
Quality is key here. The best biscuits with honey start with natural ingredients. When you pick out your butter, look for a brand with minimal ingredients—just cream and salt is perfect!
Signature Seasoning Blend
Now onto the fun part— seasonings ! Here, we’re keeping it simple.
- A single teaspoon of salt does the trick.
- If you want to jazz things up, consider adding a sprinkle of black pepper or cayenne for a nice zing! That’s totally up to you!
Biscuit-making is all about balance . The sweetness of the honey glaze will really shine when you add just a hint of salt!
Smart Substitutions
Life happens, right? If you find yourself short on buttermilk, don’t sweat it!
-
Common alternatives include mixing regular milk with a splash of vinegar or lemon juice. just 3/4 cup of milk + 1 tablespoon of either gives you a quick buttermilk hack.
Perfect for those moments when you're like, “oh no, what do i do now?!”
-
If you're looking for a maple syrup substitute for honey , just swap in an equal amount. Your sweet honey glaze recipe will take on a new, fun flavor twist!
Remember, cooking is all about improvisation.
Kitchen Equipment Essentials
Alright, let’s talk kitchen gear —those trusty tools that will make your life easier.
- Mixing bowls : Get a good set. A large one for mixing the dry and wet ingredients, and another for combining them.
- Baking sheet : A firm favorite in any kitchen! Line it with parchment paper to avoid any sticky situations.
- Pastry cutter : Or a fork will do—the goal here is to cut in that chilled butter until it's crumbly. This step is crucial for achieving those flaky biscuit techniques!
- Biscuit cutter : You don’t want to squish your dough, so opt for a sharp cutter . Help those biscuits rise!
Practical Tips
Keep an eye on ingredient freshness, folks! Check expiration dates—no one wants stale biscuits. Store buttermilk properly ; it typically lasts about 2 weeks in the fridge but always check!
Also, give your biscuit dough a little chill time in the fridge. This helps the butter re-cool and improve texture, helping you bake the perfect biscuit.
The beauty of baking perfect biscuits lies in understanding those little details. When it comes time to whip up the magic, keep that chilled dough, and those quality ingredients close.
So, now you're armed with everything you need to start baking those delightful homemade buttermilk biscuits . But we're not done yet! Buckle up, ‘cause it’s time for the fun part—let’s jump into those step-by-step instructions for making biscuits everyone will rave about! Get ready to impress with this classic biscuit recipe!
Professional Cooking Method for Baking the Perfect Biscuit
Oh my gosh, let’s talk about one of the ultimate southern comfort foods: buttermilk biscuits ! honestly, there’s something just heavenly about a fluffy biscuit with a drizzle of sweet honey glaze.
Today, we’re diving deep into the essential steps, methods, and tricks you need to bake buttermilk biscuits with sweet honey glaze that would put any diner to shame.
Ready? let's get cookin'!
Essential Preparation Steps
Before you even think about preheating your oven, let’s get organized. you’ve probably heard the fancy term “mise en place” , which just means having everything in its place.
Gather your ingredients: 2 cups of all-purpose flour, ¾ cup of buttermilk, and ½ cup of cold, cubed butter . trust me, laying everything out makes the process smoother than a southern drawl.
Timing is also crucial. set a timer for 15- 20 minutes for baking, but keep an eye on those beauties.
And let’s not forget about safety! use oven mitts because hot pans aren’t a joke, my friends.
Step-by-Step Process
Ready for the fun part? Here’s your roadmap to biscuit bliss. Follow these simple steps:
- Preheat your oven to 425° F ( 220° C) – yes, that’s hot!
- Grab a baking sheet and line it with parchment paper to avoid any sticky situations.
- In a big mixing bowl, whisk together all the dry ingredients : flour, baking powder, baking soda, and salt.
- Next, add in your cold butter. Using a pastry cutter or a fork, work it until the mixture looks like wet sand.
- Pour in that buttermilk and stir. Here’s the kicker: mix it just until combined. Over-mixing will lead to rock-hard biscuits, and we want soft and tender biscuits .
- Transfer the dough to a floured surface. Fold it a few times to create layers. This step is key for those light, fluffy textures.
- Pat or roll the dough out to about 1-inch thick . Use a biscuit cutter to shape those rounds.
- Place the biscuits close together on your baking sheet. Aiming for soft edges? Yes, please!
- Pop them in the oven for 15- 20 minutes . Keep an eye out for that golden-brown color.
You’ll know they’re done when they smell like heaven.
Expert Techniques
Alright, here’s where things get pro-level. Let’s talk about a few quality checkpoints .
-
Chilling the dough : If you have a bit of extra time, chill your biscuit dough for 10 minutes before cutting. This helps with flakiness, and trust me, it’s worth it.
-
Evaluating texture : To know if your biscuits are the right texture, press gently on one with a finger. If it springs back, you’re good to go!
-
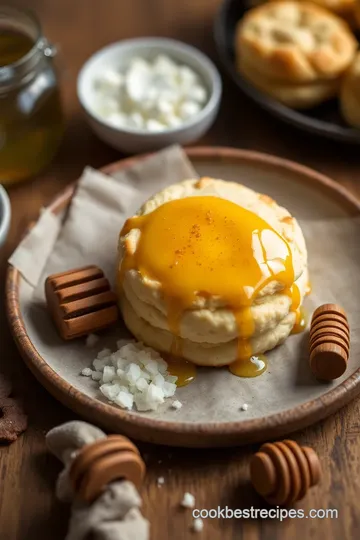
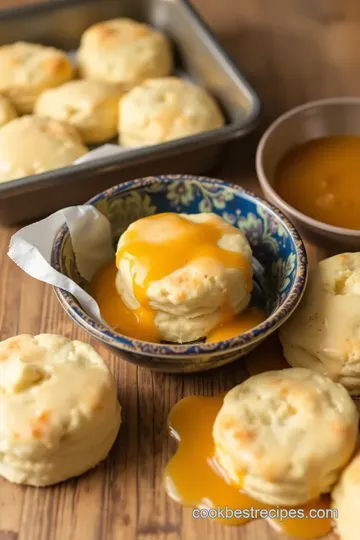
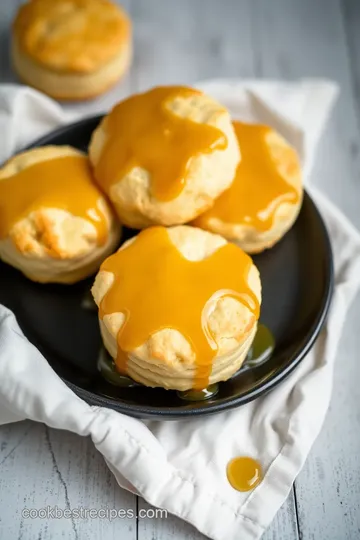
When you glaze them, mix ¼ cup of honey, 2 tablespoons of melted butter, and a dash of vanilla . Brush this luscious glaze on your hot biscuits right when they come out, and oh boy, you’ll be in sweet biscuit heaven!
Success Strategies
Now, every baker has faced a flop or two. Here are the common pitfalls to avoid:
- Overworking the dough : Gentle hands are your friend! Love your dough, don’t squeeze the life out of it.
- Not measuring correctly : Biscuits are a delicate dance. Use the right measuring cups!
Want those best biscuits with honey ? Serve them warm and fresh! Biscuits can also be made ahead. Just store them in an airtight container.
Wrap-up
So there you have it! your guide to baking perfect biscuits from scratch. sweet, tender, and fluffy just as they should be.
Don’t forget those sweet honey glaze toppings for a little extra flair! whether it’s breakfast or a side dish, these biscuits will shine at any table.
Next up, we’ve got some additional information that will keep those biscuit dreams alive! get ready for more tips, tricks, and yummy variations.
Grab your apron, and let’s keep the magic going in the kitchen!
Pro Tips & Secrets for Baking Buttermilk Biscuits
Let's dive into my favorite part of baking these fluffy buttermilk biscuits with sweet honey glaze ! you want to whip up homemade buttermilk biscuits that make you feel like a southern grandma just baked them for sunday brunch.
So here are my insider secrets straight from my kitchen to yours.
First off, chill your ingredients ! seriously, if you want those flaky layers, keep your butter and buttermilk cold. it’s a game changer.
I learned this the hard way when i once forgot to put my butter back in the fridge. the biscuits were still good, but let’s just say fluffy was not in the description.
For time-saving techniques , mix your dry ingredients ahead of time. store them in an airtight container. it'll cut down on prep time when you're ready to bake! and if you're not in a rush, consider doing a short dough chill before you roll it out.
It really helps with the texture.
Flavor enhancement? use good-quality honey for your glaze! it sends those sweet honey glaze recipes into the stratosphere of deliciousness.
Plus, a little pinch of sea salt on top after glazing adds a killer contrast. trust me, it’s worth it!
Perfect Presentation
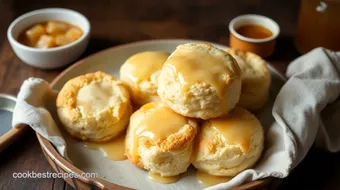
Now, on to plating ! don’t just slap those biscuits on a plate. give them love. stack them high in a cute basket or arrange them in a fan on a pretty platter.
For garnish, fresh herbs are your friend. think fresh thyme or chives scattered on top. they add not just flavor but also a pop of color.
Color combinations are everything! if your biscuits look like they belong on the cover of a magazine, people will definitely want to dig in.
A little herb butter on the side, or even a bowl of fresh fruit will add to the charm. everyone loves a little something special on their breakfast table.
Storage & Make-Ahead Tips
Life gets busy, and i totally get it! you can make these biscuits ahead of time . just freeze them after cutting into rounds.
When you're ready, pop them directly from the freezer into an oven preheated to 425° f. add a few extra minutes to the bake time and voilà! fluffy, fresh biscuits like magic!
For storage guidelines, keep leftover biscuits in an airtight container, and they can last about two days at room temperature.
If you want to keep them longer, toss them in the freezer for up to a month. just make sure to wrap them tightly.
No one likes a stale biscuit!
Creative Variations
Now, let’s get creative! i’m all for fluffy biscuit recipes that take a twist. you can swap in cheddar and chive for a savory vibe, or throw in some fresh herbs for extra flavor.
If it's fall, try adding a hint of cinnamon or pumpkin pie spice to your glaze for a seasonal twist!
And seriously, don’t shy away from experimenting! want to use a maple syrup substitute for honey ? do it! these biscuits are super versatile.
Check your pantry for whatever seasonal ingredients you can toss in. think dried cranberries or even crispy bacon bits if you’re feeling indulgent.
Complete Nutrition Guide
Okay, so just because these biscuits are comfort food doesn’t mean we can ignore the numbers. each biscuit has about 220 calories , and they pack a good punch with carbohydrates and a bit of protein.
If you swap in whole wheat flour, you get some extra fiber in there too.
For those keeping an eye on health, consider reducing the butter. you could try using yogurt or even pureed pumpkin – crazy, i know, but trust me, it works! if you’re looking for gluten-free biscuits , replace the flour with your favorite blend and add a bit more baking powder for lift.
A Sweet Conclusion
So there you have it! with these tips and tricks, you’re ready to bake buttermilk biscuits with sweet honey glaze that’ll impress everyone.
Remember, don’t overthink it. baking is all about having fun and filling your kitchen with yummy smells.
Whether you’re whipping them up for breakfast or a cozy family dinner, these fluffy biscuits will warm hearts and tummies.
Enjoy the journey, make some memories, and most importantly, dig in while they’re still warm! happy baking!
Frequently Asked Questions
What is the best way to ensure my biscuits are fluffy when I bake buttermilk biscuits with sweet honey glaze?
To make light and fluffy biscuits, keep your butter and buttermilk cold. This helps create steam during baking, leading to a lighter texture. Avoid overmixing the dough; combine the ingredients just until they come together for the best results.
Can I make the honey glaze for my baked buttermilk biscuits in advance?
Yes, you can prepare the honey glaze a day in advance. Simply whisk together the honey, melted butter, and vanilla extract, then store it in an airtight container in the refrigerator. Give it a quick stir or warm slightly before using it on your freshly baked biscuits.
How should I store leftover baked buttermilk biscuits with sweet honey glaze?
Store leftover biscuits in an airtight container at room temperature for up to two days. For longer storage, you can freeze the biscuits without the glaze in a freezer-safe bag for up to three months. Reheat them in the oven to restore their original texture before glazing and serving.
Can I make variations of the glaze for my biscuits?
Absolutely! Besides the sweet honey glaze, you can try adding flavors like lemon zest, cinnamon, or even a hint of cayenne for a spicy twist. Each variation can complement the flavors of the biscuits beautifully!
Is it possible to substitute the buttermilk in this biscuit recipe?
Yes, if you don’t have buttermilk on hand, you can make a quick substitute by mixing ¾ cup of milk with 1 tablespoon of vinegar or lemon juice. Let it sit for about 10 minutes until it thickens slightly; this will mimic the acidity of buttermilk and work well in the recipe.
What are some serving suggestions for my baked buttermilk biscuits with sweet honey glaze?
These biscuits are delightful when served warm alongside scrambled eggs or a hearty soup. They also pair wonderfully with tea or coffee for a cozy afternoon snack. Consider offering them as a side at brunch or holiday gatherings for a special touch!
Fluffy Buttermilk Biscuits with Irresistible Honey Glaze Card
⚖️ Ingredients:
- 2 cups all-purpose flour (240g)
- 1 tablespoon baking powder
- 1 teaspoon baking soda
- 1 teaspoon salt
- ½ cup unsalted butter, cold and cubed (113g)
- 3/4 cup buttermilk (180ml)
- 1/4 cup honey (85g)
- 2 tablespoons unsalted butter, melted (28g)
- 1 teaspoon vanilla extract
🥄 Instructions:
- Step 1: Preheat oven to 425°F (220°C).
- Step 2: Prepare baking sheet: Line with parchment paper.
- Step 3: Mix dry ingredients: In a large bowl, combine flour, baking powder, baking soda, and salt.
- Step 4: Cut in butter: Add cold, cubed butter to the flour mixture and work with a pastry cutter or fork until it resembles coarse crumbs.
- Step 5: Add buttermilk: Pour in buttermilk and stir until just combined; do not overmix.
- Step 6: Turn out dough: Transfer the dough onto a floured surface and gently fold it a few times to create layers.
- Step 7: Roll out: Pat or roll the dough to about 1-inch thickness, then cut into rounds using a biscuit cutter.
- Step 8: Arrange on baking sheet: Place biscuits on the prepared baking sheet, close together for soft edges.
- Step 9: Bake: Bake for 15-20 minutes until golden brown.
- Step 10: Prepare honey glaze: While biscuits bake, whisk together honey, melted butter, and vanilla in a small bowl.
- Step 11: Glaze biscuits: Once removed from the oven, brush honey glaze generously over hot biscuits.
- Step 12: Serve warm: Enjoy immediately or store for later use.
Previous Recipe: Quick & Delicious: Make Mediterranean Lentil Salad in 35 Minutes - A Family Favorite
Next Recipe: Easy & Zesty Bake Lemon Bars - Sweet & Tart Delight: My Family Favorite