Decadent Red Velvet Cookies with Gooey Chocolate Filling
Have you ever craved soft cookies with a rich chocolate center? Bake Red Velvet Cookies with Chocolate Filling that are both chewy and utterly delicious!

- Get Ready to Bake Red Velvet Cookies with Chocolate Filling!
- Your Essential Ingredients Guide: The Heart of Delicious Baking
- Master the Art of Professional Cooking: Essential Steps for Baking Red Velvet Cookies with Chocolate Filling
- Delicious Details on Red Velvet Cookies with Gooey Chocolate Filling
- Recipe Card
Get Ready to Bake Red Velvet Cookies with Chocolate Filling!
Oh my gosh, i can still remember the first time i made red velvet cookies! picture this: it was a snowy weekend, i was scrolling through social media and stumbled across a post about red velvet desserts .
My inner foodie squealed, and i thought, "i need to make these now!" little did i know, i was about to embark on a wonderfully decadent journey, and i ended up discovering how to bake red velvet cookies with chocolate filling that would make anyone’s heart skip a beat.
Seriously, have you ever had a cookie that was soft, chewy, and bursting with a gooey chocolate center? heaven!
Recipe Overview
Now, let’s dive into a little history. red velvet cake, which was all the rage in the 1920s, found its way into cookie form not too long after.
Mixing rich cocoa with buttermilk gave it that vibrant reddish hue, and when the cookies hit the scene, they became a fun twist on a classic treat.
Fast forward to today, and these colorful cookie flavors are popping up everywhere, especially around holidays and special occasions.
Honestly, this recipe is a sweet spot on the difficulty scale – i’d call it a solid medium. sure, it takes a bit more time and precision to get that gooey chocolate center just right, but isn’t that part of the fun? you can prep the dough in about 15 minutes (just enough time to sip on some coffee) and chill for about 30.
The baking time is merely 10- 12 minutes. easy peasy!
Now, let’s talk about money. this recipe costs around $10-$15 for all the ingredients, and if you’re like me and love to share, you’ll yield about 24 scrumptious cookies.
Just imagine bringing these to the office party or gifting them to a friend—seriously impressive !
Key Benefits
Let’s chat about why you should totally whip up a batch of these cookies. first up, those classic red velvet cookie recipes are not only a treat for the eyes but also have a little cocoa magic that brings added antioxidants to the mix.
Plus, with the chocolate filling, you get a delightful balance of flavors that can lift anyone's spirits.
These cookies are perfect for special occasions . From holiday gatherings to cozy celebrations with friends, they’re always a hit. Who wouldn't want to sink their teeth into soft, chewy cookies stuffed full of rich chocolate? You’ll be the star of your next potluck!
And here's a fun little bonus: these cookies easily outshine other cookie recipes because you can get creative. want to make some gourmet variations? swap the chocolate filling for a sweet cream cheese filling or even mint chocolate for a refreshing twist.
The possibilities are endless!
So, are you ready to dive into this fun baking project? trust me, you won’t regret it. grab your kitchen equipment for baking , and let’s get those ingredients together.
This cookie adventure is about to get delicious !
Now that you’re all excited and ready to go, let’s take a peek at what you’ll need to make these decadent red velvet cookies . Stay tuned!
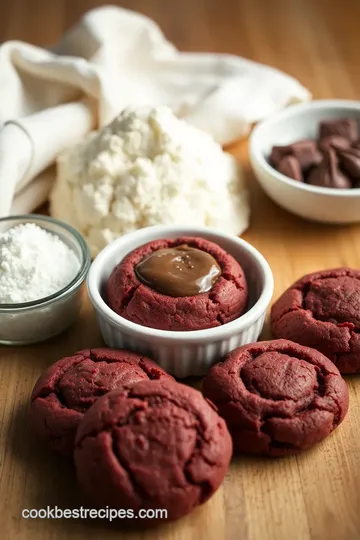
Your Essential Ingredients Guide: The Heart of Delicious Baking
Oh my gosh, you guys! if you're like me, the kitchen is your happy place. diving into baked goods is one of life’s greatest pleasures.
And nothing beats those decadent red velvet cookies with gooey chocolate filling when it comes to impressing friends and family.
I mean, who wouldn’t love a beautifully vibrant cookie with a rich chocolate center? so, let’s dive into the essentials you'll need before you whip up these easy red velvet cookies !
Premium Core Components
Here's the deal: working with the right ingredients makes all the difference. For your red velvet cookie recipe, here are some key components :
-
Measurements : you’ll want 2 ½ cups (312g) of all-purpose flour, 1 tablespoon (9g) of cocoa powder, and a whole bunch more.
It’s best to use both us and metric measurements to keep it simple.
-
Quality indicators : ever heard the saying "you get what you pay for?" yeah, it’s true in baking too! go for high-quality chocolate chips and fresh ingredients to achieve that rich gooey chocolate center.
-
Storage guidelines : keep flour in a cool, dry place. it lasts about 6-8 months , but honestly, if it’s a bit lumpy, toss it.
Cocoa powder? you’re looking at about 2-3 years in an airtight container.
-
Freshness Tips : Shop smart and look for vibrant red food coloring. If it’s faded, skip it. The bolder, the better, people! And always check expiration dates on your baking essentials.
Signature Seasoning Blend
You know what really jazzes up cookies? It’s all about those signature seasonings ! For our gooey masterpieces, consider the following:
-
Essential Spice Combinations : A little cocoa powder and vanilla make magic happen. Throw in some cream cheese filling for extra flavor—because why not?
-
Herb Selections and Pairings : While herbs aren't typical in cookies, a touch of fresh mint extract could totally add a fun twist if you're feeling adventurous.
-
Flavor Enhancers : Don’t sleep on a good quality vanilla extract . This stuff is your best friend in baking.
-
Regional Variations : Want a unique twist? Substitute chocolate filling with a peanut butter filling to create a whole new cookie experience!
Smart Substitutions
Life happens, and sometimes you find out you’re short on an ingredient. That’s cool—let’s think ahead with some smart substitutions :
-
Common Alternatives : Out of semi-sweet chocolate chips? Go for dark chocolate or even chopped up peanut butter cups. Yum!
-
Dietary Modifications : For gluten-free cookies, use a gluten-free flour mix. There’s a lot out there that works like a charm!
-
Emergency Replacements : If you find yourself out of red food coloring, beet juice can give you that vibrant hue naturally.
-
Seasonal Options : When fall rolls in, why not swap cocoa for pumpkin spice? It’s a delicious seasonal spin!
Kitchen Equipment Essentials
Alright, let’s chat kitchen gadgets! Having the right tools makes the biggest difference in whipping up your chocolate-filled cookies :
-
Must-Have Tools : You’ll want mixing bowls, a whisk, and a baking sheet. Parchment paper is a MUST to avoid any disasters.
-
Alternative Equipment : Don’t have a cookie scoop? A tablespoon works just fine!
-
Preparation Tips : Make sure to cream your butter well. Takes about 3- 4 minutes , guys. The fluffier the better!
-
Storage Solutions : Store your baked cookies in an airtight container—they’ll last longer and stay soft and chewy.
There you have it! with these essentials, you’re well on your way to mastering that yummy red velvet cookie recipe.
Now that we’ve covered the basics, let’s get into the heart of things—the instructions on how to bake red velvet cookies with chocolate filling ! can't wait to see you whip these up!
Master the Art of Professional Cooking: Essential Steps for Baking Red Velvet Cookies with Chocolate Filling
There’s something undeniably special about baking, especially when it comes to cookies. today, i want to dive into the professional cooking method that will help you whip up the most decadent red velvet cookies with gooey chocolate filling .
Trust me, these cookies are not just treats; they're experiences. let’s take a peek at how to make it all happen.
Essential Preparation Steps
First things first, let’s chat about mise en place . it sounds fancy, right? it just means having everything in its place.
Before you start, gather all your ingredients. measure out 2 ½ cups of flour and 1 cup of sugar like i do! this little step prevents chaos later, especially when you're knee-deep in cookie dough and chocolate!
Next up is time management . if you think baking is just throwing ingredients together, think again! divide your time wisely.
Spend about 15 minutes prepping, and remember, chilling your dough for 30 minutes is crucial. it’ll give your cookies that perfect texture and help avoid the dreaded flat cookie disaster.
Now, let’s talk organization strategies . i’m a big fan of keeping my workspace tidy. as you mix, clean as you go.
It’ll save you from that post-baking mountain of dishes. set up your baking station: one side for mixing, one for assembling, and one for baking.
You’ll feel like a pro, i promise!
And don’t forget about safety considerations ! when working with ovens, always check that yours is preheated to 350° f ( 175° c) before baking your cookies.
A quick burn can ruin your day, not to mention your cookies!
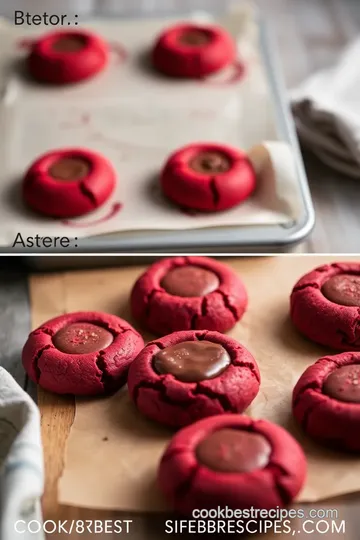
Step-by-Step Process
Now, onto the fun part—let’s break it down into some easy-to-follow steps.
-
Prepare the chocolate filling: heat ½ cup of heavy cream in a double boiler until it’s on the verge of boiling.
Stir in 1 cup of chocolate chips until it’s all melted and smooth. let it chill in a dish for about 30 minutes .
-
Mix Dry Ingredients: In a bowl, whisk together 2 ½ cups of flour , 1 tablespoon of cocoa powder , 1 teaspoon of baking soda , and ½ teaspoon of salt .
-
Cream butter and sugar: beat ¾ cup of softened butter with 1 cup of granulated sugar for about 3- 4 minutes .
It should be light and fluffy. then, add in that 1 large egg , a touch of vanilla extract , and 1 tablespoon of red food coloring —this is where the magic begins!
-
Combine Wet and Dry Ingredients: Gradually introduce your dry mix to the wet mixture. Mix until it’s just combined. We don't want to overdo it.
-
Chill the Dough: Cover it up and let it chill for 30 minutes . Seriously, don’t skip this!
-
Preheat the Oven: While that’s chilling, pop your oven on to 350° F ( 175° C) .
-
Assemble the cookies: form balls from the dough and flatten them out. place a teaspoon of that chilled chocolate filling in the center, then wrap it up.
Roll it back into a ball.
-
Bake: Line your baking sheet with parchment paper and scoop those cookies on. Bake for 10- 12 minutes until they’re set on the edges but still soft in the middle.
-
Cool and Serve: Let them rest on the baking sheet for a few minutes, then transfer them over to cool completely.
Expert Techniques
Now here’s where it gets even more interesting. when you’re in the baking zone , there are a few expert techniques to keep in mind.
Always check for temperature control ; you want that chocolate filling to be warm and gooey for that perfect bite!
As you bake, look for visual cues. if the edges are firm but the centers look a tad puffy, you’re golden.
That means you’ll have soft and chewy cookies, almost like they're hugging a gooey chocolate center.
Success Strategies
Let’s be real, we all make mistakes. the most common one? overbaking! you don’t want rock-hard cookies. remember, they will continue to cook a bit once out of the oven.
Aim for that sweet spot and trust your instincts!
Quality assurance tips can be as simple as using high-quality ingredients. That semi-sweet chocolate? Don’t skimp! It’ll make or break those gooey chocolate-filled cookies.
If you’re looking for some make-ahead options , they freeze beautifully! just store them in an airtight container, and when it’s time to indulge, pop them in the microwave for a few seconds.
So there you have it! with these tips, you’ll master the professional cooking method in no time and bake red velvet cookies with chocolate filling like a pro.
And, oh my gosh, they’re absolutely worth every bit of effort.
As we wrap this up, stay tuned for the next section where I share some Additional Information about baking techniques and variations that’ll take your cookie game to the next level!
Delicious Details on Red Velvet Cookies with Gooey Chocolate Filling
When i think about the cozy joy of baking, my mind immediately drifts to those decadent red velvet cookies with gooey chocolate filling .
Oh my gosh, these soft and chewy cookies are like a little hug in dessert form! but before you dive into the world of vibrant cookie bliss, let’s chat about some extra goodies that'll help you perfect this classic treat.
Pro Tips & Secrets
Here’s a few of my personal secrets that keep my chewy red velvet cookies on point. first off, softened butter is key! make sure it’s at room temp before you start mixing.
This helps whip it into that light and fluffy texture we all love. you know that moment when you taste that sweet bite and think, “wow, this is grand”? yeah, that’s because the butter was just right.
Chill your dough! seriously, don’t be tempted to skip this step! pop it in the fridge for about 30 minutes.
It helps prevent those cute little cookies from spreading out too much. as for flavor enhancement, a pinch of salt balances that sweetness perfectly.
Presentation-wise, I suggest serving these beauties on a colorful plate with a sprinkle of powdered sugar on top. Trust me, folks go wild over those gooey chocolate centers!
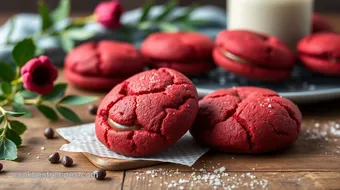
Perfect Presentation Techniques
Let’s not forget about the visual appeal . after all, we eat with our eyes first, right? when you plate your cookies, arrange them in a circle for that eye-catching look.
For a fun garnish, toss on some fresh raspberries or a drizzle of melted white chocolate. this totally jazzes it up!
Mix up your color combinations, too. the vibrant red from these cookies looks phenomenal next to a dollop of soft cream cheese frosting or even vanilla ice cream.
It's like a party on a plate !
Storage & Make-Ahead Tips
Alright, you might be wondering, “what if i want these for later?” no sweat! store them in an airtight container at room temperature for about three days .
If you want to keep that gooey center longer, toss them in the fridge—though they might lose a bit of that fresh-baked charm.
Reheating in a microwave for about 10 seconds can help regain that melted chocolate goodness!
Creative Variations
If you're feeling like a little cookie rebel, there are tons of creative variations to explore. swap out that rich chocolate filling for a tangy cream cheese filling if you're into that! imagine a taste explosion of sweet and tangy… seriously, it’s a must-try.
You can also add in some chopped pecans or even white chocolate chips if you want to shake things up.
For a seasonal twist perfect for the holidays, you could throw in a little peppermint extract for that Christmas vibe. You know, yum!
Complete Nutrition Guide
Now, i’m all about enjoying delicious treats, but it's always good to understand what you’re munching on. each cookie comes in at around 150 calories .
It’s not too heavy, so enjoy them without the guilt! they’re made with wholesome ingredients, and while they aren’t exactly health food, they can brighten up any day.
Expert FAQ Solutions
You might have a question or two, like, “What if my cookies spread too much?” No problem! Make sure you chill the dough enough and keep an eye on the baking time.
And if you’re wondering about the gooey chocolate center, just be sure to refrigerate your filling long enough before using it.
That’ll help keep it from spilling out like a chocolate lava eruption!
Wrap-Up
Baking these easy red velvet cookies with a gooey chocolate center might become your new favorite thing. the combination is just straight-up soul-satisfying! they’re perfect for special occasions, fun for baking with kids, or just as a sweet treat at the end of the day.
So gather your ingredients, and let’s “bake red velvet cookies with chocolate filling!” keep exploring new creative spins on this classic—you’ll never run out of gourmet cookie recipes to try.
Remember, every cookie is a little piece of happiness. Happy baking!

Decadent Red Velvet Cookies with Gooey Chocolate Filling Card
⚖️ Ingredients:
- 2 ½ cups all-purpose flour
- 1 tablespoon cocoa powder
- 1 teaspoon baking soda
- ½ teaspoon salt
- ¾ cup unsalted butter, softened
- 1 cup granulated sugar
- 1 large egg
- 1 teaspoon vanilla extract
- 1 tablespoon red food coloring
- 1 cup semi-sweet chocolate chips
- ½ cup heavy cream
🥄 Instructions:
- Step 1: In a double boiler or microwave, heat the heavy cream until just boiling.
- Step 2: Add chocolate chips and stir until melted and smooth.
- Step 3: Pour the mixture into a small parchment-lined dish and chill in the refrigerator until firm (about 30 minutes).
- Step 4: In a mixing bowl, whisk together flour, cocoa powder, baking soda, and salt.
- Step 5: In a separate bowl, beat softened butter and granulated sugar until light and fluffy (about 3-4 minutes).
- Step 6: Add egg, vanilla extract, and red food coloring; mix until well combined.
- Step 7: Gradually add the dry mixture to the wet mixture, mixing until just combined.
- Step 8: Cover the dough and refrigerate for 30 minutes to firm up.
- Step 9: Preheat the oven to 350°F (175°C).
- Step 10: Use a cookie scoop to form balls of dough. Flatten each ball, place a teaspoon of chocolate filling in the center, and enclose the filling with dough; roll gently into a ball again.
- Step 11: Place on a baking sheet lined with parchment paper, ensuring space between each cookie.
- Step 12: Bake for 10-12 minutes until edges are set but centers remain soft.
- Step 13: Let cool on the baking sheet for 5 minutes before transferring to a wire rack to cool completely.
Previous Recipe: How to Bake Heavenly White Chocolate Macadamia Cookies: A Chewy Delight!
Next Recipe: How to Bake Peanut Butter Cookies - Soft & Chewy: My Grandmother's Secret