Cocoa Striped Rolled Wafer Cookies
Ever wondered how to achieve those delightful cocoa striped rolled wafer cookies? With rich cocoa and buttery layers, they're a perfect treat to share!

- Cocoa Striped Rolled Wafer Cookies: A Delicious Twist on a Classic Treat
- Essential Ingredients Guide: Your Go-To for Perfect Cookies!
- Mastering Professional Cooking: The Art of Cocoa Striped Rolled Wafer Cookies
- Pro Tips & Secrets for Cocoa Striped Rolled Wafer Cookies
- Perfect Presentation for Cocoa Cookies
- Storage & Make-Ahead
- Creative Variations to Explore
- Complete Nutrition Guide
- Expert FAQ Solutions
- Recipe Card
Cocoa Striped Rolled Wafer Cookies: A Delicious Twist on a Classic Treat
Let me take you back to a lazy sunday afternoon. picture this: the sun is shining, birds are chirping, and i've got this itch to dive into the world of cookies.
You know the kind of moment—when you can feel that sweet craving kick in, and all you want to do is whip something up? that's when i stumble upon the recipe for cocoa striped rolled wafer cookies .
Seriously, folks, these cookies are like a cozy hug in dessert form. with layers of rich cocoa and buttery vanilla, they’re a delightful twist on your traditional rolled wafer cookies.
Trust me; this is a recipe you'll want to have in your back pocket!
A Little Taste of History
Did you know that rolled wafer cookies have been around for ages? originating in europe, they've found their way into countless kitchens and hearts.
Back in the day, these delicate treats were often reserved for special occasions—think weddings, holidays, and festive gatherings. fast forward to now, and they're still just as popular, making their way into modern baking with delicious variations.
With all the baking techniques popping up, getting these cookies just right might take some practice, but i swear it's worth it for those crispy cocoa treats!
Recipe Overview
So, once you’re ready to dive into making these cookies, here’s what you need to know. the prep time is around 20 minutes , and if you chill the dough for about 30 minutes , you’re looking at a total of an hour before those cookies hit the oven.
They take about 10– 12 minutes to bake , and voilà! the yield is approximately 24 cookies , perfect for sharing… or not! 😉
As for the cost, making these cookies is pretty wallet-friendly. with some basic pantry staples like butter, sugar, and cocoa powder, you won’t break the bank.
Plus, they make an elegant gift, so you can use them for those last-minute holiday presents without losing your cool!
Why You’ll Love These Cookies
I gotta say, these cookies pack a punch when it comes to flavor and texture. They’re more than just a pretty face—let’s break down some key benefits .
-
Health benefits: while we all know cookies aren’t exactly health food, these beauties made from cocoa powder do have some antioxidants! not to mention, by using quality ingredients, you can make them a bit better for you than your standard grocery store goodies.
-
Uniquely Delicious: There’s just something about the buttery vanilla stripes contrasting with the rich chocolate layers that make these cookies truly special. They’re not just another sweet treat; they’re a conversation starter!
-
Versatile delight: whether it's a family gathering or just a quiet night in, these cookies fit the occasion perfectly. pair them with coffee, serve them at birthday celebrations, or use them as a decorative addition to dessert platters.
-
Beyond ordinary: honestly, these cookies are a treasure compared to other cookie recipes out there. while you might have a go-to chocolate chip recipe or simple butter cookies, these bring an interesting twist to the cookie jar.
Plus, they’re fun to make!
With all that in mind, you’re probably itching to know what went into these scrumptious cookies cocoa striped rolled wafer delights! next, let’s dive right into the ingredients that’ll bring this recipe to life.
Get ready to roll, literally!
So, good friends, get your aprons on and let’s get to creating some of the most scrumptious, gourmet cookies you’ve made yet! whether you're baking solo or inviting some pals over to join, these cookies will surely have everyone coming back for more.
Happy baking!
Essential Ingredients Guide: Your Go-To for Perfect Cookies!
Baking is like magic, right? you toss in a bunch of simple ingredients, and out pops something incredible. when it comes to whipping up those cookies cocoa striped rolled wafer cookies , let’s kick off by diving into the essentials.
We need to talk measurements, quality, and what makes those cookies really shine.
Premium Core Components
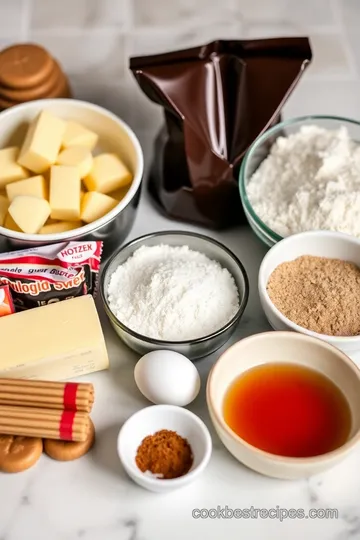
Let’s talk about the nitty-gritty of baking. You wanna be precise, especially with measurements. Here’s the scoop on what to use:
- Cocoa Powder: 1/2 cup (40 g) of unsweetened cocoa powder adds that rich chocolate flavor. Look for a brand that’s deep in color and has a fresh aroma.
- Flour: 2 cups (250 g) of all-purpose flour will give your cookies a solid structure. The fresher, the better. Store it in an airtight container and keep it cool.
- Sugar: Grab 1 cup (200 g) of granulated sugar. If it feels clumpy, toss it out.
Storage? Keep most of these ingredients in a cool, dry place. For longer freshness, pop them in the fridge if you can. And don’t hesitate to always check for the expiration dates!
Signature Seasoning Blend
Now, let’s spice things up! Even for our cocoa cookies, we need the right blends.
- Vanilla Extract: Just one teaspoon makes everything a little sweeter. Look for pure extract, not imitation. Trust me; it’s worth it!
- Salt: Just 1/4 teaspoon might seem small, but it helps all those flavors pop.
Feeling adventurous? You could try adding spices like cinnamon or even a dash of espresso powder for an extra kick. It’s all about making those flavors sing.
Smart Substitutions
Now, life happens! Sometimes you’re mid-bake and realize you’re out of one ingredient. Here are some smart swaps to keep those rolling wafer cookies on point:
- Butter: If you’re dairy-free, coconut oil works like a charm.
- Sugar: You can swap it for brown sugar; it’ll add a touch of caramel flavor.
- Flour: Need it gluten-free? Go for a gluten-free blend and make sure it's one that works well for baking.
Even in those emergencies, don’t panic! There’s always a fix.
Kitchen Equipment Essentials
Okay, let’s talk tools. You don’t need a whole bakery, but a few solid pieces will get you far:
- Mixing Bowl: Get a sturdy one. Nothing fancy, just something that won’t tip over when you're mixing that butter and sugar.
- Rolling Pin: This bad boy will help you roll out dough evenly.
- Baking Sheets: A good non-stick sheet lined with parchment paper is key to avoid any cookie disasters.
- Cooling Rack: Seriously, if you don’t have one, grab one! It makes cooling those cookies so much easier.
Final Thoughts Before We Get to Baking
Now that you’ve got the lowdown on ingredients and tools, it’s time to create some magic with your cocoa striped rolled wafer cookies.
With crispy layers of cocoa and rich cocoa flavors, each bite is a treat, and trust me, your friends will brag about your baking skills.
Picture it; you serve them with a flick of a smile. oh, what a sweet impact!
Remember, the baking process is just as fun as the end result. So, let’s roll up those sleeves and dive into the recipe without holding back! Do you have your butter softened and your oven preheated? We're going to turn this kitchen into a sweet treat paradise!
Mastering Professional Cooking: The Art of Cocoa Striped Rolled Wafer Cookies
Whether you're a seasoned baker or just starting in the kitchen, mastering the cocoa striped rolled wafer cookies will elevate your skills and impress your friends! think of these as a mix between cookies and elegant european pastries.
Seriously, we’re talking rich cocoa flavor mingling with buttery vanilla. oh my gosh, just writing this makes me crave them! let's break it down into bite-sized chunks.
Essential Preparation Steps
First things first— mise en place . this french term just means having everything in its place before you start. measure out your ingredients: butter, sugar, cocoa powder.
.. you get the picture. it keeps chaos at bay, trust me!
Time management is key. take a moment to figure out how long each step will take. prep time for these cookies is about 20 minutes , plus an extra 30 minutes for chilling.
Knowing this helps you plan better.
Now let’s talk organization strategies . keep your workspace tidy. use bowls for dry ingredients and another for wet ones. and hey, keep a towel nearby for spills.
We've all been there, right? safety first, though —always handle your baking tools with care. oven mitts are your friends, especially when things are hot out of the oven!
Step-by-Step Process
Here’s where it gets fun! Grab your mixing bowls and let’s do this.
-
Cream the butter: In a mixing bowl, beat 1 cup of softened unsalted butter with 1 cup of sugar until it's light and fluffy. Honestly, seeing that transformation is pure magic.
-
Add an egg and vanilla: Beat in 1 large egg and 1 teaspoon of vanilla extract . This is where the dough starts to get that classic cookie vibe.
-
Mix in dry goodies: Gradually add 2 cups of all-purpose flour , 1/2 cup of unsweetened cocoa powder , and 1/4 teaspoon salt . Knead it until you’ve got a soft dough.
-
Chill, baby, chill: Divide the dough and wrap one portion in plastic. Chill for 30 minutes . This step? Crucial for rolling!
-
Roll it out: After chilling, roll out the cocoa dough to about 1/8-inch thick . You want those layers to be nice and even.
-
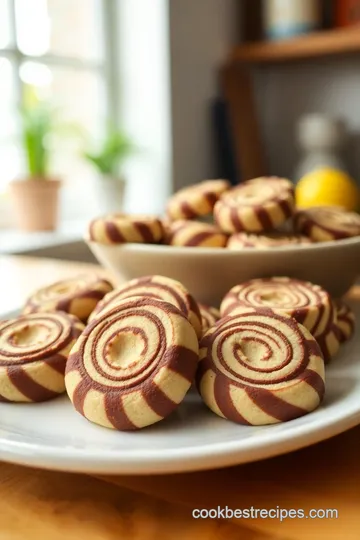
Form those stripes: Roll out your second dough (the vanilla one), and cut it into strips. Lay them across the cocoa base. It’s about the aesthetics here, right?
-
Roll into logs: Roll the doughs up, pinching seams as you go. Place the logs on a parchment-lined baking sheet.
-
Bake away: Preheat your oven to 350° F ( 175° C) and bake for 10- 12 minutes . Keep an eye on them—the edges should be lightly golden.
-
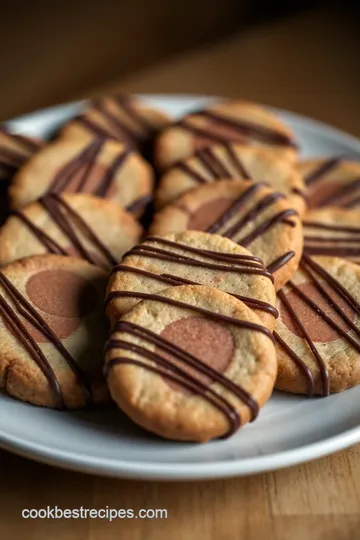
Cooling time: Let those beauties cool before diving in. If you wanna dip them in chocolate, do it when they’re completely cool. Yes, it makes a difference!
Expert Techniques
Let’s take this up a notch! quality checkpoints are essential. you want to look for that perfect cookie texture: soft inside, crisp outside.
If they’re a little doughy, pop them back in for a minute or two. not quite golden? you’ll know to add a touch more time.
And if your dough feels too sticky? Chill it again! Trust me, a chilled dough is a happy dough.
Success Strategies
Now, how do you ensure these cookies come out perfect? Avoid classic mistakes like overbaking or underchilling! It can ruin the texture.
Let’s talk quality assurance —always taste your dough (don't freak out, it’s just butter and sugar!). and if you’re planning ahead, these cookies can be made early.
Just keep those logs wrapped up in the fridge. long story short: perfect cookies are just a little prep away.
Wrapping Up and Additional Information
So there you have it! from essential preparation steps to expert techniques, you’re well on your way to baking these amazing cocoa striped rolled wafer cookies .
Seriously, they’re not just another recipe; they add flair to your dessert table. you could dip them in melted chocolate or serve alongside some vanilla ice cream for extra indulgence.
Next time you’re in the mood for easy dessert recipes , give these a shot. they’re worthy of any family gathering or fancy dinner.
If you're curious about variations, try mixing in some chocolate-dipped versions or even play with textures using crispy cocoa treats.
Look out for my next post, where we'll dive deeper into tips and tricks for other delectable sweets! Happy baking, friends!
Pro Tips & Secrets for Cocoa Striped Rolled Wafer Cookies
Oh my gosh, making cocoa striped rolled wafer cookies is such a fun adventure in baking! you’re gonna love it.
Here are some pro tips that i learned the hard way—and trust me, they’ll save you time and effort!
Chef’s Personal Insights
When creaming the butter and sugar, go for at least 3- 4 minutes of mixing until it’s nice and fluffy.
This aeration is key for getting that perfect cookie texture! also, let your ingredients—especially the butter —come to room temperature.
It makes a world of difference.
Time-saving Techniques
Chilling your dough is crucial for those clean, crisp lines in your cookies. i usually make it the day before, pop it in the fridge, and let it chill overnight.
This way, you’re ready to roll when it’s time to bake!
Flavor Enhancement Tips
If you want to make these cocoa cookies really pop, consider adding a pinch of sea salt to the melted chocolate before dipping the cookies.
The contrast between the sweet chocolate and salted flavor is pure magic.
Presentation Advice
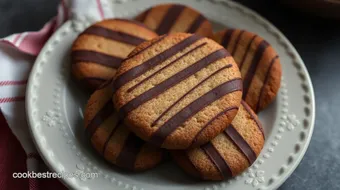
When it's time to show off your cookies, stack them on a colorful plate or a wooden board. A dash of cinnamon on top or a drizzle of white chocolate can make it look oh-so-gourmet!
Perfect Presentation for Cocoa Cookies
Let’s face it—presentation matters, especially when you’re impressing friends or family with your baking skills.
Plating Techniques
Try arranging your cookies in a circular pattern on a platter. place the larger ones toward the center and the smaller ones around the edges.
It draws the eye and makes it look like you put in a lot of effort!
Garnish Ideas
Fresh berries or mint leaves can add a splash of color and give your cookies that final touch. You could even dust some powdered sugar on top for a snowy effect!
Color Combinations
Pair those chocolate-dipped cookies with vibrant raspberry or strawberry preserves on the side. Not only do they make your dessert pop, but they taste fantastic together!
Visual Appeal Tips
Remember, we eat with our eyes first. The crunchiness of the rolled wafer cookies coupled with the glossy chocolate dip is enough to make anyone's mouth water!
Storage & Make-Ahead
With all that effort you put into making these cookies, you’ll want to keep them in top shape.
Storage Guidelines
Store your cocoa striped rolled wafer cookies in an airtight container. They'll last up to about a week, but good luck keeping them around that long!
Preservation Methods
For longer freshness, consider freezing them. Just make sure to freeze them in layers separated by parchment paper. They can last for about a month in the freezer!
Reheating Instructions
To get that fresh-baked crunch back, pop them in a preheated oven at 300° F ( 150° C) for about 5 minutes. This will bring out those flavors beautifully!
Freshness Duration
Nothing beats a freshly baked treat, but keeping them airtight helps maintain that cookie goodness for days.
Creative Variations to Explore
Flexibility in baking can be so fun! Here are some creative variations to think about.
Flavor Adaptations
Wanna mix it up? Try adding orange zest for a citrus kick or even hazelnut extract for an earthy flavor twist.
Dietary Modifications
Easily swap out butter for coconut oil or use an egg replacer if you’re going for a vegan version.
Seasonal Twists
How about a little pumpkin spice during fall? It can give a cozy vibe to your cocoa cookies!
Regional Variations
You can even go global by adding matcha for a Japanese twist or incorporating spices like cardamom for an exotic flair.
Complete Nutrition Guide
Let’s talk about what you're indulging in!
Detailed Breakdown
Each cookie has about 150 calories and includes some protein and fiber. Not too shabby for such a rich dessert!
Health Benefits
The cocoa powder offers antioxidants, which is definitely a plus when you're indulging in sweet treats.
Dietary Considerations
If you’re watching your sugar intake, try substituting with a natural sweetener.
Portion Guidance
Stick with one or two cookies at a time—they’ll hit the spot without overindulging. You want to savor every bite!
Expert FAQ Solutions
Got questions? I’ve got answers! Here’s a troubleshooting guide for your cookie-making journey.
Common Questions
“Why are my cookies spreading too much?” If your dough is too warm, adjust by chilling it longer!
Troubleshooting Guide
If the texture is off, remember: colder dough makes for better, crispier cookies.
Success Tips
Layer your flavors! Try combining different icings or fillings to elevate those cocoa cookies.
Variations Explained
Love the cocoa flavor but want something different? Swap half of the cocoa with chocolate chips for double the chocolatey goodness.
In closing, don’t be afraid to experiment and have fun! whether you stick to the classic recipe or explore unique cookie recipes, those cocoa striped rolled wafer cookies are sure to impress anyone who takes a bite.
Happy baking!
Cocoa Striped Rolled Wafer Cookies Card
⚖️ Ingredients:
- 1 cup (227 g) unsalted butter, softened
- 1 cup (200 g) granulated sugar
- 1 large egg
- 1 teaspoon vanilla extract
- 2 cups (250 g) all-purpose flour
- 1/2 cup (40 g) unsweetened cocoa powder
- 1/4 teaspoon salt
- 1/2 cup (85 g) semi-sweet chocolate chips, melted
🥄 Instructions:
- Step 1: In a mixing bowl, cream together the softened butter and granulated sugar until light and fluffy.
- Step 2: Add the egg and vanilla extract, mixing until combined.
- Step 3: Gradually incorporate the flour, cocoa powder, and salt until a soft dough forms.
- Step 4: Divide the dough into two equal portions. Shape one into a rectangular block and wrap in plastic wrap. Chill for 30 minutes.
- Step 5: On a lightly floured surface, roll out the chilled dough to about 1/8-inch thickness. Cut into rectangular shapes as desired.
- Step 6: Roll out the second chilled dough (vanilla dough), and cut into strips. Place them on top of the cocoa rectangles to form a striped pattern.
- Step 7: Carefully roll the dough into logs, pinching the seams to seal. Place the logs on a baking sheet lined with parchment paper.
- Step 8: Preheat the oven to 350°F (175°C). Bake for 10-12 minutes or until the edges are lightly golden.
- Step 9: Allow cookies to cool on a rack. Once cooled, dip one end in melted chocolate, if desired.
Previous Recipe: How to Make Heavenly Divinity Cookies: A Sweet Meringue Delight
Next Recipe: Ultimate Umami Infusion: Easy Cooking Sake Replacement Recipe