Decadent Dutch Cocoa Cookies Recipe
Want to indulge in decadent Dutch cocoa cookies? Try my foolproof recipe for chewy, rich treats! You'll love their chocolatey flavor and texture. Let's bake!

- A Sweet Journey Begins: The Dutch Cocoa Cookie Adventure
- The Sweet Story Behind Dutch Cocoa Cookies
- Why You Need These Cookies in Your Life
- Essential Ingredients Guide: Setting Up for Deliciousness
- Elevate Your Cookie Game with Professional Cooking Techniques
- Pro Tips & Secrets for Dutch Cocoa Cookies
- Perfect Presentation: Making Your Cookies Eye-Catching
- Storage & Make-Ahead Tips
- Creative Variations: Play with Flavors
- Complete Nutrition Guide: Indulge Smartly
- Expert FAQ Solutions: Answers to Your Burning Questions
- Conclusion: Get Bakin’!
- Recipe Card
A Sweet Journey Begins: The Dutch Cocoa Cookie Adventure
Oh my gosh, do you remember the first time you took a bite of a freshly baked cookie? like, the way the warm, chewy center melted in your mouth? that memory takes me straight back to grandma’s kitchen, filled with the smell of something magical baking in the oven.
Honestly, those moments inspired me to whip up my own batch of dutch cocoa cookies . trust me, every time i make these, it’s like a hug in cookie form.
So, why should you try your hand at these easy chocolate cookies ? well, these cookies are packed with rich dutch-process cocoa that transforms a simple baking session into a homemade chocolate experience you won't forget.
Grab your mixing bowl and let’s take a deep dive into the delicious world of these chewy cocoa cookies .
The Sweet Story Behind Dutch Cocoa Cookies
The origin of these decadent delights leans heavily on their rich dutch-process cocoa. this type of cocoa was actually invented in the netherlands in the 1800s.
It’s known for its smooth sweetness that makes chocolate lovers swoon! over the years, these cookies have grown in popularity, showing up not just in backyard barbecues but also at fancy dessert tables during the holidays.
They're like the cool kid of the cookie world, always there to make a good time even better.
When it comes to baking these beauties, you can whip them together in about 15 minutes , plus you’ll want to chill the dough for 30 minutes .
Once you pop them in the oven for 12- 15 minutes , you’re just about ready to dive into chocolate heaven! and don’t worry too much about the difficulty; if you can mix butter and sugar, you’re golden.
These cookies are perfect for both seasoned bakers and those just getting started.
One of the best parts? these dutch cocoa cookies won't break the bank. for about $8, you can make a batch that yields around 24 cookies .
A tasty way to sweeten your day without breaking the bank!
Why You Need These Cookies in Your Life
Let’s talk benefits! first and foremost, these cookies give you a boost of rich cocoa flavor that’s hard to beat.
The nutrition isn’t too shabby either—each cookie weighs in at around 150 calories . that sounds pretty reasonable for a little indulgent treat, right?
But that’s not all! cookies are often served at every occasion from birthday parties to lazy sunday afternoons. plus, they have this incredible ability to bring people together.
Seriously, who can resist a cookie tray? with a bag of chocolate chip cookies in one hand, and one of these chewy cookies in the other, you’re really on the way to a crowd-pleasing dessert plate.
Amazing as is, but you could get creative! want to jazz it up? toss in some chocolate chips , or sprinkle in a pinch of cinnamon for an unexpected twist! baking techniques like chilling the dough can really elevate the cookie texture and help keep them from spreading too much.
Just imagine those perfectly defined edges when you pull them from the oven.
And if you’re more of a sharing type, these cookies make for fantastic homemade dessert gifts . just package them in a cute box or on a plate and watch your friend’s eyes light up.
Baking these isn’t just about the end result; it’s about the memories you create and the smiles you put on faces!
Now, i know you’re itching to get moving with this recipe, so let’s dive into those ingredients and get baking! don’t worry; we’ll navigate this step by step.
It’s going to be a sweet journey, i promise!
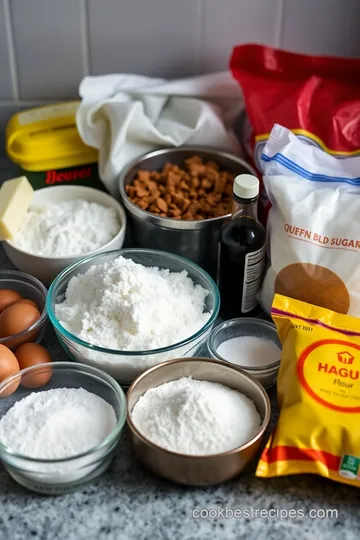
Essential Ingredients Guide: Setting Up for Deliciousness
When it comes to baking, the right ingredients can make or break your sweet treats. if you’re diving into dutch cocoa cookies , you want to equip your pantry with quality essentials.
Trust me, having premium core components gives you a serious leg up.
Premium Core Components
First off, let’s get into the nitty-gritty of ingredient measurements . For those measuring like a pro, use these:
- 1 cup (226g) unsalted butter
- 1 cup (200g) granulated sugar
And if you're anywhere outside the U.S., you can’t forget that metric conversion. It’s super important!
Quality indicators matter, too. look for rich, dark cocoa powder, like dutch-process cocoa . if it looks premium and smells intense, you’ve got a winner.
When it comes to storage, keep your pantry tidy. most of these ingredients can hang around for ages, but cocoa powder? it’s best used within a year for optimum flavor.
And freshness tips? If you're ever unsure, give the ingredient a sniff. If it doesn’t pass the smell test, it’s time to toss it!
Signature Seasoning Blend
Now, seasonings are your best buddies when crafting those chewy cocoa cookies . a pinch of salt intensifies chocolate, while a touch of vanilla extract adds warmth.
And if you want something special, consider mixing in spices like ground cinnamon or even a little espresso powder. honestly, this can elevate your cookie game to a whole new level.
Regional variations can be a fun twist, too. Want to embrace a spicy vibe? Try adding a bit of cayenne for a kick!
Smart Substitutions
Ever found yourself halfway into a recipe and realized you’re out of an ingredient? It happens! No worries— smart substitutions are here to save the day.
If you’re fresh out of unsalted butter, salted can do the job—just ease up on the added salt. and if you're sticking to a gluten-free diet? swap the all-purpose flour with a gluten-free blend.
If you're feeling adventurous, you can even use almond flour for a nutty kick.
Sometimes you just need to get creative with emergency replacements . You're out of chocolate chips? No problem! Chopped up chocolate bars work just as well.
Kitchen Equipment Essentials
Let’s not forget about the tools that help bring your cookie vision to life. You will want some must-have tools on hand:
- Good mixing bowls
- A trusty electric mixer (if you’re like me and can’t live without it)
- Baking sheets lined with parchment paper
Preparation tips? Preheat the oven to 350° F ( 175° C) before you start mixing to ensure even baking.
And for storage, grab an airtight container. This keeps your homemade cookies fresh and chewy and perfect for weeks to come!
Now that we have the essentials in place, you're ready to create magic in the kitchen. next up, let’s dive into the delectable world of dutch cocoa cookies and put those ingredients to good use.
Grab your mixing spoon and let’s bake these beauties!
Elevate Your Cookie Game with Professional Cooking Techniques
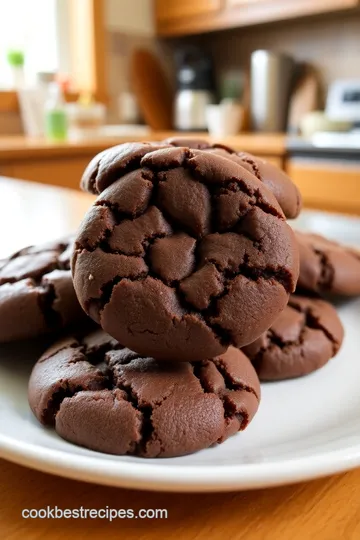
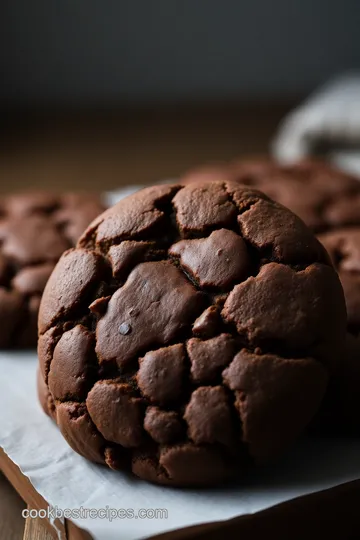
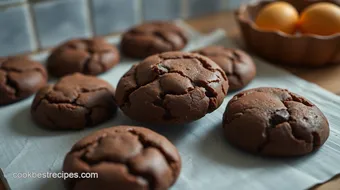
Oh my gosh, if there’s one thing i love, it's whipping up a batch of dutch cocoa cookies ! seriously, with their chewy inside and crispy edges, these bad boys are chocolate heaven.
You don’t have to be a pro chef to get that perfect cookie texture, but having some solid baking techniques does make a big difference.
Join me as we dive into some essential preparation steps, a step-by-step process for baking these cookies, some expert techniques to elevate your skills, and the strategies that’ll ensure success every time!
Essential Preparation Steps
Mise En Place
First off, let’s talk about mise en place —a fancy term for having everything in its right place. before you start mixing and blending, prep your ingredients.
Measure out your flour, cocoa powder, and sugars, and have them ready to go. trust me; it saves you time and minimizes chaos.
Plus, it’s super satisfying to tick everything off your list!
Time Management
Timing is everything, especially when it comes to baking. take a little time to read through your recipe instructions (spoiler: this is gonna include me walking you through the steps for those awesome easy chocolate cookies ).
Once you have a feel for what’s needed, setting a little timer while you mix, bake, and cool can help keep everything on track.
"hey, i am a multitasker, but i'm no octopus!"
Organization Strategies
Keep your workspace neat. a clutter-free area helps you focus. got flour all over your counter, and chocolate chips rolling under the fridge? nope, we don’t want that! have a designated place for wet and dry ingredients, and you’ll find everything’s just smoother.
Safety Considerations
Safety first, friends! keep those hot baking sheets away from the edge of the counter, and always use oven mitts.
Remember, a little precaution goes a long way. and hey, don’t be too quick to dive into that cookie dough; raw eggs are a no-go for munching!
Step-by-Step Process
- Preheat your oven to 350° F ( 175° C).
- Cream together 1 cup of softened butter , 1 cup of granulated sugar , and 1 cup of brown sugar until fluffy.
- Add in 2 eggs one at a time and then 2 teaspoons of vanilla extract . Mix well.
- In another bowl, sift 2 ½ cups of all-purpose flour , ¾ cup of Dutch-process cocoa , 1 teaspoon of baking soda , and ½ teaspoon of salt .
- Gradually mix the dry ingredients into the wet mixture. Make sure not to overmix!
- (Optional) Fold in ½ cup of chocolate chips for that sweet burst.
- Let’s get chilling! Pop the dough in the fridge for 30 minutes . This not only firms it up but enhances that delightful texture!
- Scoop tablespoon-sized dollops onto a lined baking sheet; leave a bit of space between them.
- Bake for 12- 15 minutes . They should look set at the edges but a little soft in the middle.
- Cool on the sheet for 5 minutes before transferring them to a wire rack.
Expert Techniques
Now that you’ve mastered the basics, let’s talk like the pros!
- Temperature Control: Make sure your butter is softened, but not melting. This is key for those chewy cocoa cookies .
- Timing Precision: Keep a close eye on those cookies as they bake. Remember, they’ll continue to cook a little after coming out of the oven!
- Quality Checkpoints: Know your dough. If it's too sticky, add a bit more flour; if crumbly, a splash of milk can help bind it up.
- Troubleshooting Tips: Did your cookies spread out too much? Next time, chill the dough longer!
Success Strategies
To really nail those rich chocolate desserts , avoid common pitfalls!
- Common Mistakes: Overmixing and errant measurements can lead to weird textures. Keep things balanced!
- Quality Assurance Tips: Always use fresh ingredients. Trust me; those old cocoa powders hiding in the back of your pantry aren't doing you any favors.
- Perfect Results Guide: The key is in cooling. Let them rest a bit so they can firm up to that perfect cookie texture.
- Make-Ahead Options: You can freeze unbaked dough for up to three months. Just scoop it onto a baking sheet and freeze, then transfer to a zip lock. Boom—fresh cookies in no time!
In the end, these dutch cocoa cookies are a sure fire way to impress friends and family alike. with just a few professional cooking methods and tips, you’re on your way to cookie greatness.
Now you’re set to dive deeper with Additional Information... about ingredient substitutions and variations to make these cookies even more incredible! Happy baking!
Pro Tips & Secrets for Dutch Cocoa Cookies
Oh my gosh, let me tell you something about dutch cocoa cookies —they're not just any cookies; they're a chocolate lover's dream! i’ve baked my fair share of easy chocolate cookies, and let me share a few pro tips that’ll take your cookie baking to the next level.
First up, use room-temperature butter . it makes a world of difference in the perfect cookie texture . just imagine biting into a chewy cocoa cookie that melts in your mouth! don't forget to chill your cookie dough for at least 30 minutes.
This helps with shaping and keeps your cookies from spreading too much in the oven. i’ve been there—no one likes flat, sad cookies!
Flavor enhancement? yes, please! try adding a touch of espresso powder or cinnamon to your dough. it’ll elevate those rich chocolate flavors to something magical.
Seriously, once you taste it, there’s no going back.
Perfect Presentation: Making Your Cookies Eye-Catching
When it comes to plating techniques , presentation is everything! you want to make people drool before they even take a bite, right? stack those delectable dutch cocoa cookies high on a pretty plate.
Drizzle them with some chocolate ganache or sprinkle a little sea salt on top for the wow factor.
For garnishing, how about some fresh mint leaves or a dusting of powdered sugar? it adds color and makes your cookies look like they belong in a bakery window.
Color combinations can change the entire vibe of your dessert. think about pairing chocolate with some vibrant berries or a scoop of vanilla ice cream for a nice contrast.
Trust me, it’s a visual feast!
Storage & Make-Ahead Tips
Now, let’s talk leftovers—or, maybe just cookie storage tips. if you’re lucky enough to have some cookies left (which is a rarity at my house), store them in an airtight container.
Proper preservation methods can keep those treats fresh for about a week. if you want to get fancy with your homemade cookies, toss a slice of bread in there.
It keeps everything soft and chewy.
And if you want to make-ahead? just scoop your cookie dough balls onto a baking sheet and freeze them. once frozen, transfer them to a ziplock.
When a chocolate craving strikes, just pull some out and bake straight from frozen. no fuss, no waiting!
Creative Variations: Play with Flavors
Okay, let’s get creative! there are tons of cookie variations to explore. if you want a nutty crunch, add some chopped walnuts or pecans.
Feeling adventurous? toss in a bit of orange zest for a refreshing twist that pairs beautifully with rich cocoa desserts.
You can also go wild with your chocolate chip options. use semi-sweet, dark, or even white chocolate for a fun surprise.
If you’re dealing with dietary preferences, gluten-free cookie recipes are totally doable. simply swap the flour for a gluten-free blend and you're good to go!
Complete Nutrition Guide: Indulge Smartly
Let’s face it, we all want scrumptious treats, but it’s nice to know what we’re eating too. a typical serving of our dutch cocoa cookies comes in at about 150 calories.
Not to mention the protein and fiber! if you’re mindful of sugar, think about using coconut sugar for a healthier choice or playing around with healthy cookie substitutions.
With a bit of thought on portion guidance , these crowd-pleasing cookies can fit right into a balanced dessert strategy. After all, life’s too short not to enjoy a rich chocolate dessert!
Expert FAQ Solutions: Answers to Your Burning Questions
Got questions? i bet you do! common queries often involve how to keep those chewy cocoa cookies soft. a quick fix: don’t over bake them.
The cookies will continue cooking on the tray after you take them out of the oven. if they look slightly underdone, that’s perfect!
For those new to baking, a troubleshooting guide is key. overmixed dough? cue hard cookies. so mix just until combined.
Don’t be afraid—before you know it, you’ll have the best cookie recipes in your back pocket.
Conclusion: Get Bakin’!
Whether you’re a cookie connoisseur or a baking newbie, this Dutch cocoa cookie recipe offers a deliciously fun experience in the kitchen. Have fun experimenting with flavors and presentation.
So grab your apron, roll up those sleeves, and get to baking some indulgent treats ! you’ve got this, and those homemade dessert gifts will be the highlight of any gathering.
Happy baking!
Decadent Dutch Cocoa Cookies Recipe Card
⚖️ Ingredients:
- 1 cup (226g) unsalted butter, softened
- 1 cup (200g) granulated sugar
- 1 cup (220g) packed brown sugar
- 2 large eggs
- 2 teaspoons pure vanilla extract
- 2 ½ cups (312g) all-purpose flour
- ¾ cup (70g) Dutch-process cocoa powder
- 1 teaspoon baking soda
- ½ teaspoon salt
- ½ cup (90g) semi-sweet chocolate chips (optional)
🥄 Instructions:
- Step 1: Preheat the oven to 350°F (175°C).
- Step 2: In a mixing bowl, cream together the softened butter, granulated sugar, and brown sugar until light and fluffy.
- Step 3: Add eggs, one at a time, mixing until fully incorporated, then add vanilla extract.
- Step 4: In another bowl, sift together flour, cocoa powder, baking soda, and salt.
- Step 5: Gradually add the dry ingredients to the wet mixture, mixing until just combined. Avoid overmixing.
- Step 6: (Optional) Stir in chocolate chips if desired.
- Step 7: Chill the dough for 30 minutes in the refrigerator for better shaping and texture.
- Step 8: Scoop tablespoon-sized dough onto a lined baking sheet, spacing them apart.
- Step 9: Bake in the preheated oven for 12-15 minutes, or until edges are set but centers are still soft.
- Step 10: Let cool on the baking sheet for 5 minutes before transferring to a wire rack to cool completely.
Previous Recipe: How to Freeze Uncooked Hatch Peppers: 5 Easy Tips for Flavor
Next Recipe: How to Make Heavenly Divinity Cookies: A Sweet Meringue Delight