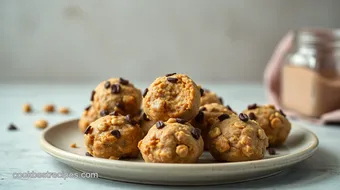
No-Bake Peanut Butter Energy Bites
Craving a quick, nutritious snack? Try these No-Bake Peanut Butter Energy Bites | 40 min! They’re a sweet, satisfying treat that everyone loves.

- A Quick Energy Fix You’ll Love
- A Little Bit of History
- What to Expect
- What’s Next?
- The Essential Ingredients Guide: Cooking Up Some Fun!
- Mastering the Art of Professional Cooking: A Fun Journey into the Kitchen
- Pro Tips & Secrets to Perfect Your No-Bake Peanut Butter Energy Bites | 40 min
- Perfect Presentation for Mouthwatering Energy Bites
- Storage & Make-Ahead: Keeping Your Snacks Fresh
- Creative Variations: Think Outside the Box
- Complete Nutrition Guide: Know Your Bites
- Expert FAQ Solutions: Your Questions Answered
- Wrapping It Up
- Recipe Card
A Quick Energy Fix You’ll Love
So, let me take you back to a day when my energy levels were lower than my bank account after a weekend out.
I was juggling work, kids, and the daily grind, feeling like a zombie. suddenly, i remembered my go-to: no-bake peanut butter energy bites | 40 min .
Have you ever had one of those days where grabbing something quick feels like a chore? just thinking about whipping these up sparks joy.
These delightful little bites are life-savers! seriously, they’re a perfect no-bake snack and incredibly simple to whip together. with just a few pantry staples, you can satisfy that mid-afternoon slump without hunting for an energy drink.
Plus, let’s be real—aren’t we always on the lookout for healthy energy bites that taste great?
A Little Bit of History
Now, let’s talk about where this recipe comes from. the idea of energy bites isn’t new; people have been making quick, nutritious snacks for ages.
But recently, they’ve exploded in popularity, especially among parents and athletes. i mean, who wouldn’t want a simple, no-cook recipe packed with goodness?
You’ll find these bites in homes across the country—perfect for lunch boxes, post-workout snacks, or even late-night cravings. they fit into any busy lifestyle, and in just 40 minutes , you can have a batch ready to go.
What to Expect
The best part? they’re incredibly easy! if you can mix and roll, you can master this recipe. honestly, it’s like riding a bike—once you do it, you’ll be making them all the time.
Plus, it’s wallet-friendly! you won’t break the bank with this one, and you’ll yield about 12 energy bites. perfect for meal prep snacks for the week!
Let’s talk about why you’ll love these little gems.
Why You’ll Love Them
One of the biggest perks of these peanut butter recipes is the health benefits. they’re loaded with protein, fiber, and healthy fats.
Each bite offers about 3 grams of protein, which is pretty amazing, considering they’re a treat!
These bites are not just nutritious snacks ; they’re versatile, too. got a kiddo with a sweet tooth? these are healthy treats for kids that pack a punch.
They’re also great for athletes needing a quick pick-me-up before or after workouts—talk about energy boosters !
Got guests coming over? Serve these at your next gathering for an impressive, easy-to-make snack . Seriously, who wouldn’t be impressed with homemade energy bars that taste amazing?
Perfect for Any Occasion
Whether you’re planning a picnic, looking for quick snacks for kids , or just seeking something to nibble on while binging your favorite show, these bites fit the bill.
They shine during the summer months as chilled snacks , but they’ll seriously do wonders all year round.
And let’s not forget the simplicity factor! no baking, no fuss—just mix, roll, and chill. this is what quick and easy recipes are all about.
They also cater to various dietary needs—go vegan, stick with nut butter alternatives, or keep ‘em gluten-free. the options are endless!
What’s Next?
Ready to dive into the world of no-bake peanut butter energy bites ? let’s gather our ingredients and get started! the fun part is just a wink away.
Trust me, once you get used to making these flourless energy bites , you might find yourself experimenting with all kinds of additions—from dried fruits to different nut butters!
Let’s roll up our sleeves and whip up something surprisingly good. Grab that peanut butter, and let’s get started on this delicious journey!

The Essential Ingredients Guide: Cooking Up Some Fun!
Hey there, fellow food lovers! if you're diving into the culinary world, knowing your essential ingredients is just like cbd in a great smoothie—it's what makes everything better! so, let’s break it down to help you master the art of cooking.
Premium Core Components
First things first— detailed measurements . you want to nail those recipes, right? so, whether you’re working with us cups or metric grams, be sure to have a trusty measuring cup or scale handy.
For example, in our upcoming no-bake peanut butter energy bites | 40 min recipe, you’ll use 1 cup (90 g) of rolled oats.
Easy peasy!
Now, let’s chat about quality indicators . always choose creamy peanut butter that’s smooth and free of funky additives. don’t be shy—check the labels! and when it comes to oats? look for those that are whole grain with minimal processing.
When you’re storing these ingredients, think cool and dry. you can keep whole oats in your pantry for up to 6 months .
But nut butters? pop 'em in the fridge, and they can last up to 6 months too! to select the best, always check the expiration date.
Fresh is best, my friends!
Signature Seasoning Blend
Seasoning is where the magic happens! for that signature vibe , stock up on essential spice combinations . things like cinnamon, garlic powder, and paprika can transform a dish from mundane to mouth-watering.
Herbs? oh, they’re a game changer. think basil paired with tomatoes or parsley with meats. they breathe life and flavor into your dishes! if you’re feeling adventurous, try out regional variations like taco seasoning from the southwest or garam masala for an indian twist.
Smart Substitutions
So, what happens when you’re out of an ingredient? no worries! here’s where smart substitutions shine. no honey? grab maple syrup.
Almond butter instead of peanut butter? go for it; they all bring that nutty goodness!
If you’re looking for dietary modifications , consider using nut butter alternatives or even sunflower seed butter for that nut-free flair.
And if you feel like going vegan, just swap honey with agave nectar.
Sometimes, you’re just in a pinch! What if you need emergency replacements ? If you’re out of oats for our energy bites, try using crushed cereal or even ground flaxseeds. Super versatile!
Kitchen Equipment Essentials
Now, let’s talk gear! you want your kitchen equipment essentials to be top-notch. must-haves include a mixing bowl, spatula, and a baking tray.
Trust me, having a good set of tools will change your kitchen game!
If you don’t have a fancy food processor, don’t sweat it! a strong spoon or your hands can do the trick for mixing.
And for storage? airtight containers are your best friend. you can keep snacks—like those no-bake peanut butter energy bites—fresh in the fridge for an easy grab!
Closing Thoughts
As you get ready to whip up delicious snacks, remember this guide on your journey towards being a kitchen superstar.
With the right ingredients and equipment, crafting healthy energy bites or even a no-bake dessert can be quick and fun!
So, grab those rolled oats and peanut butter, because in a short 40 minutes , you’ll have a nutritious snack ready to fuel your day.
Whether you're whipping up that quick snack for kids or prepping energy boosters for your next workout—it's all gonna be a breeze!
Stay tuned for those detailed instructions, and let's get rolling on those No-Bake Peanut Butter Energy Bites ! Happy snacking!
Mastering the Art of Professional Cooking: A Fun Journey into the Kitchen
Getting into cooking can feel overwhelming, right? Well, don’t sweat it! Let’s dive into some professional cooking methods that’ll have you whipping up delicious dishes like a pro in no time.
Essential Preparation Steps: Your Kitchen Decking Out
First things first, mise en place is your best buddy. french for “everything in its place,” it means having all your ingredients prepped and organized before you cook.
Chop your veggies, measure your spices, and set everything out. trust me, your future self will be singing your praises when the cooking action starts.
Now, let’s talk time management . it’s all about focusing on tasks. you don’t wanna be scrambling to sauté your onions while your water boils over.
Get things like your pasta cooked or your cookies baked first, then move on to the smaller tasks.
Organization is also key! keep the workspace tidy. you’d be surprised how cleaning as you go can keep your sanity intact.
And safety? always hold knives properly and watch those fingers. it's easy to brush these aside, but taking a moment to remind yourself can save you from a nasty cut.
Step-by-Step Process: Get Ready to Cook
When diving into your cooking project, follow clear, numbered instructions. start by preheating your oven to 375° f for baking cookies, or aim for medium-high heat if you’re pan-searing.
Keep your eyes peeled at 15- 20 minutes for most veggies; they’ll give you those gorgeous caramelization cues when they're done.
Timing is crucial; overcooked food is a real bummer. a fun little trick? use visual cues to know when your meat is perfectly cooked.
For chicken, look for that lovely golden color. if you’re frying an egg, the whites should be set while the yolk remains runny—delish!
Expert Techniques: Unlocking Culinary Secrets
Ready to take it up a notch? let's break down some professional methods . for instance, when you're roasting veggies, a good rule is to space them out on the tray.
This ensures they brown evenly!
Don't forget to check for quality; if something doesn’t smell right, don’t use it! and, if you find yourself stuck, don't panic.
If your sauce is too thick, add a splash of water. if your dish is too salty? a pinch of sugar can balance things out.
Success Strategies: Your Magic Touch
Here’s the scoop: common mistakes usually stem from not reading the recipe thoroughly. so, take a moment and check! another key tip? always taste as you go.
This is how you learn what flavors dance well together.
For the best results, make sure your ingredients are fresh. for example, using fresh herbs in your salad elevates everything! and for those meal prep warriors out there, your no-bake peanut butter energy bites | 40 min can be a total lifesaver.
They’re easy to whip up, super nutritious, and perfect for quick snacks for kids or a little afternoon pick-me-up.
Simplifying Snacks: No-Bake Peanut Butter Energy Bites
Okay, i have to shout out this recipe: no-bake peanut butter energy bites . seriously, if you're looking for healthy energy bites or nut butter alternatives , this recipe rocks! you mix some oats, honey, and your favorite nut butter (i’m obsessed with peanut butter, but almond works well, too).
Chill for 25 minutes , and boom—you have the perfect on-the-go snack.
The kids love ‘em, athletes can use ‘em as little energy boosts, and they are gluten-free and low-sugar ! plus, it takes only about 40 minutes from start to finish.
Adorable snack jars filled with these bites feel like a win for everyone at the table!
So, whether you’re just getting started or you've been in the kitchen a while, remember that cooking is about having fun while creating something delicious.
Don't stress too much over the little things, enjoy the process, and keep experimenting. now, let's transition into some additional information to get even more fuel for your culinary adventures!

Pro Tips & Secrets to Perfect Your No-Bake Peanut Butter Energy Bites | 40 min
Let’s be real. these no-bake peanut butter energy bites aren’t just quick snacks; they’re little nuggets of joy. i whip these up when i need something sweet but still want to keep it healthy.
Here are a few pro tips to make your energy bites come out even better.
First off, use fresh ingredients . seriously, this isn’t just a tip; it’s a game changer. fresh peanut butter and oats give a much richer flavor and texture to your bites.
And hey, don’t skimp on the salt—just a pinch can really make the sweetness pop!
Need to save some time? here’s a little secret: make a big batch and freeze some for later. you can pop them out and thaw them when hunger strikes! chilling them for at least 25 minutes not only firms them up but also melds those delightful flavors together.
Flavor enhancement ? Consider a splash of vanilla! It takes these bites from good to wow! Oh, and if you want a bit of crunch, toss in some chopped nuts or seeds.
Perfect Presentation for Mouthwatering Energy Bites
A little deliciousness goes a long way, so why not make your No-Bake Peanut Butter Energy Bites look just as tasty as they are? Presentation matters, y’all!
Start with color combinations . Use a mix of white and dark chocolate chips for visual appeal. How about a sprinkle of coconut flakes on top? Total glam!
And don’t forget your plating techniques. use a fun plate, like a bright one, and stack those energy bites high.
Maybe add some sliced fruits on the side, like strawberries or bananas. it makes everything look so irresistible!
Storage & Make-Ahead: Keeping Your Snacks Fresh
Wondering how to store your energy bites? You definitely want to keep them in an airtight container in the fridge. They’re good for about a week—if they last that long!
Want to know how to make these babies ahead of time? just double the recipe and freeze half. they’ll last for a month.
Just place them in individual bags for easy grab-and-go snacks.
To reheat, just leave them out for a few minutes. No need for an oven or microwave—let those beauties come to room temperature.
Creative Variations: Think Outside the Box
Feeling adventurous? There are so many ways you can change these energy bites up!
Try adding coconut flakes if you’re craving a tropical vibe, or toss in some dried fruits to bring a touch of sweetness.
If you’re after a protein boost, go ahead and mix in some protein powder.
Got dietary restrictions? No problem! You can swap peanut butter with almond butter or sunflower seed butter for nut-free bites. Trust me, these variations mean you’ll never get bored!
Complete Nutrition Guide: Know Your Bites
Let’s chat nutrition. Each of these healthy energy bites is about 100 calories. They pack in about 3 grams of protein, making them a great choice for protein snacks .
Flaxseeds add fiber, while oats provide slow-release energy. And honestly? This is a win-win when you’re looking for nutritious snacks !
If you want to manage portion size, just stick to one or two bites. they’re dense, so a little goes a long way.
Plus, if you’re counting carbs, remember they’re a treat that fits pretty nicely into your meal plan.
Expert FAQ Solutions: Your Questions Answered
You might be wondering what to do if your bites are too crumbly or sticky. troubleshooting tip : if they’re crumbly, add a touch more peanut butter.
If too sticky, mix in a bit more oats.
And if you’re looking for a quick and easy snack recipe, you can’t go wrong with these! They’re great for kids, too. Seriously, my niece devours them after school!
Wrapping It Up
So there you have it! these no-bake peanut butter energy bites | 40 min are not just easy to whip up but also super versatile and delicious.
Whether you need a quick snack for kids, a post-workout energy boost, or just something sweet without the guilt, you've got this!
With the ideas and tips i’ve shared, you’re ready to make these bites your own. so get in the kitchen, have some fun, and enjoy every bite! you’ll be amazed at how something so simple can be such a powerhouse.
Happy snacking!

No-Bake Peanut Butter Energy Bites Card
⚖️ Ingredients:
- 1 cup (90 g) rolled oats
- 1/2 cup (125 g) creamy peanut butter (or almond butter)
- 1/3 cup (113 g) honey or maple syrup
- 1/4 cup (40 g) mini dark chocolate chips
- 1/4 cup (30 g) ground flaxseeds (optional)
- 1/2 teaspoon vanilla extract
- A pinch of salt
🥄 Instructions:
- Step 1: In a mixing bowl, combine the rolled oats, ground flaxseeds, and salt.
- Step 2: In a separate bowl, whisk together the peanut butter, honey (or maple syrup), and vanilla extract until smooth.
- Step 3: Pour the wet ingredients into the dry ingredients. Stir until fully combined.
- Step 4: Fold in the mini dark chocolate chips until evenly distributed.
- Step 5: With clean hands, take tablespoon-sized portions of the mixture and roll them into bite-sized balls.
- Step 6: Place the formed bites on a baking tray lined with parchment paper. Refrigerate for at least 25 minutes to firm up.
- Step 7: Transfer the energy bites to an airtight container and store in the refrigerator for up to a week.
Previous Recipe: Ultimate Fried Potatoes Nacho Fries with Cheese Sauce: Easy Comfort!
Next Recipe: How to Fry Corn Fritters for a Tasty Snack: My Family's Favorite!