Vintage Santa Cookie Jar Cookies
Wondering how to whip up amazing Vintage Santa Cookie Jar Cookies? I've got tips from my kitchen to yours that will make holiday baking a breeze!

- The Sweet Charm of Vintage Santa Cookie Jar Cookies
- A Classic with Modern Appeal
- Baking Goodness That’s Good for You
- The Transformative Power of Cookies
- Essential Ingredients Guide to Festive Baking Bliss
- Mastering Professional Cooking: Tips for Success in the Kitchen
- Sweet Secrets to Vintage Santa Cookie Jar Cookies
- Recipe Card
The Sweet Charm of Vintage Santa Cookie Jar Cookies
Oh my gosh, let me take you back to a cozy december night, surrounded by the delightful aroma of freshly baked cookies.
Memory lane takes me to my grandma's kitchen, decked out with vintage santa decorations and that iconic vintage cookie jar sitting proudly on the counter.
Can you feel that warmth? it was all about the holiday baking , and those cookies were magic—soft, buttery bites of nostalgia.
They’d end up in that vintage santa cookie jar , ready to be devoured with family over milk or egg nog.
So today, let’s dive into a recipe that captures that very essence: vintage santa cookie jar cookies !
A Classic with Modern Appeal
The origins of these cookies are baked right into american holiday tradition. they reflect a time when homemade goodies brought families together.
Now, while they might have the old-school vibe, holiday cookie recipes like these never go out of style. they’re all the rage at cookie exchanges or festive gatherings.
Honestly, who doesn’t want an excuse to munch on sweet, spiced cookie recipes ?
Speaking of time requirements, you’re looking at about 1 hour and 30 minutes total— 20 minutes of active prep and around an hour for chilling.
The best part? even if you're a novice baker, this recipe is medium in difficulty. that means you’ll get a bit of practice managing dough without diving into anything too crazy!
Now, about costs. these cookies won't break the bank. you’re mostly using pantry staples and some holiday flair—bring on the colorful sprinkles and chopped nuts! you’ll end up with about 24 delightful cookies, ready to share or fill your cookie jar decor .
Perfect for filling that vintage santa cookie jar !
Baking Goodness That’s Good for You
Now, let’s talk about the key benefits. these cookies aren't just tasty; they pack a little punch in the nutrition department, too! using wholesome ingredients, they make a great treat for the whole family.
Plus, they’re perfect for those lazy winter afternoons when you want to whip up something homemade to share with friends.
These cookies work wonders for special occasions—think holiday parties, cookie swaps, or cozy evenings in with family. they evoke warmth and nostalgia, all while being super easy to customize.
Want to mix it up? try nut-free options or even some unique cookie flavors by swapping chocolate chips or dried fruit in.
And let’s be real, who hasn’t experienced the joy of a family baking session? baking with kids enhances those magical moments.
Roll the dough, cut out shapes, and decorate with cookie decorating ideas that shine, making it a bonding experience you’ll cherish forever.
The Transformative Power of Cookies
Now that you can practically taste the festive goodness, let me gently glide you over to the list of ingredients. So get your measuring cups ready!
These Vintage Santa Cookie Jar Cookies will charm their way into your holiday heart and, obviously, your cookie jar! Grab your apron, warm up that oven, and let’s get ready to bake some memories!
I hope this really sets your mood for starting such a nostalgic recipe! are you ready to fill that vibrant vintage santa cookie jar ? let’s keep rolling to the ingredient section where we can get down to the delicious nitty-gritty.
Essential Ingredients Guide to Festive Baking Bliss
When it comes to holiday baking, there's nothing quite like loading up your vintage santa cookie jar with mouth-watering goodies.
You know the ones—the cherished cookies that your grandma made, the kind that takes you back in time with every bite.
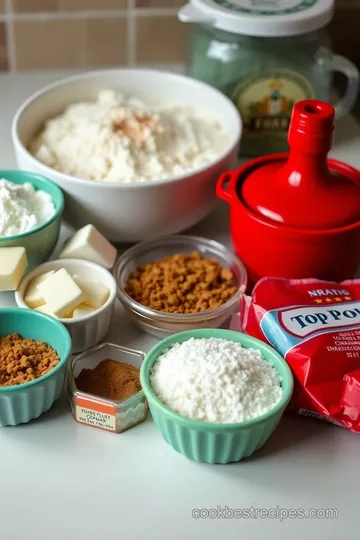
So, let’s dive into some essential ingredients that will make your holiday cookie recipes shine!
Premium Core Components
First off, let’s talk specifics! For those soft, buttery cookies, measurements are crucial. Here’s a quick breakdown for you:
- Flour: 2 ¾ cups (345g) all-purpose flour is your best friend.
- Sugars: A combo of 1 cup (200g) granulated sugar and ½ cup (100g) packed light brown sugar brings sweetness and depth.
What about quality indicators ? look for fresh, fragrant spices. ground cinnamon should smell warm and aromatic! with storage, keep your flour in a cool, dry place—an airtight container is a game-changer.
Believe me; crispy cookies are in the details! most ingredients last about 6 months in storage, so don’t skimp on freshness.
Want to impress someone at your next cookie exchange? check the dates on your baking powder and soda. freshness tips ? whenever possible, buy in small quantities to ensure you're using top-notch ingredients.
A little care goes a long way!
Signature Seasoning Blend
Okay, let’s spice things up! a signature blend of spices transforms your holiday cookie recipes from ordinary to extraordinary. essential spices like cinnamon and nutmeg are must-haves, but don’t forget about herbs .
A dash of vanilla extract can really enhance those classic cookie flavors.
Different regions have their own twists. think of pumpkin spice in fall or peppermint during the holidays. oh my gosh, peppermint and chocolate? what an unbeatable combo! if you want something unique, how about adding cardamom or even some chili powder for a kick? yup, it’s that simple.
Smart Substitutions
So, what happens if you’re missing an ingredient? Calm down! We’ve all been there. Here are some common alternatives that can save the day:
- Butter: Coconut oil works wonders if you want something dairy-free. It’ll yield soft and nutty cookies.
- Flowers for Peppermint: If you can’t find peppermint extract, use an all-natural flavoring or even fresh mint!
Being equipped with emergency replacements can save you from a last-minute scramble. Plus, seasonal options? Try incorporating cranberries in the fall or lemons in spring. You can always reinvent your cookie game!
Kitchen Equipment Essentials
You don’t need a fancy kitchen to whip these up. Just a few must-have tools will do:
- Mixing bowls and measuring cups are essential. Without them, you’re gonna have chaos!
- An electric mixer can be a life-saver for all those festive desserts, making it easier to beat the butter and sugar together until fluffy.
But if you don’t have a mixer, no sweat! you can always do it by hand— talk about a workout! also, make room for a good baking sheet .
Trust me, a non-stick one will have you winning in the cookie department.
Embrace the Journey
Baking shouldn’t feel like a chore. rather, think of it as a warm, fuzzy hug. as we gear up for those holiday baking marathons, just remember—it’s all about those classic cookie flavors and the memories they create! with your vintage cookie jar filled with spiced cookie recipes , you’ll be set for all the fun december gatherings.
So, whether you’re planning a cozy night of baking with kids or your best mates, the ingredients and tools we chatted about will set you up for success.
Oh, and don’t forget to check out the cookie decorating ideas! who doesn’t love colorful sprinkles?
Whipping up some delicious cookies has never been more important. After the ingredients are gathered and your tools are ready, let's dive into the sweet journey of actually making those Vintage Santa Cookie Jar Cookies ! Your taste buds and your vintage Santa decorations will thank you later!
Mastering Professional Cooking: Tips for Success in the Kitchen
So, you wanna elevate your cooking game to that pro level? totally get it! learning some essential preparation steps can take your culinary skills from basic to top-notch.
Grab your apron, and let’s dive into the world of professional cooking!
Essential Preparation Steps
First up, mise en place —french for “everything in its place.” it’s all about getting organized. chop your veggies, measure your spices, and line up your ingredients before you even think about firing up the stove.
This makes everything easier. honestly, there’s nothing worse than realizing you need to chop some garlic midway through mixing dough!
Now, let’s talk time management . timing is key in cooking! for instance, if you're baking some holiday cookie recipes like these vintage santa cookie jar cookies, set a timer for your baking times.
It’s like having your own sous-chef! need to make a side dish and a dessert? good luck juggling them both without a plan.
Break tasks down, and tackle them in order, just like layering a cake—base first, then fill and frost!
When it comes to organization strategies , keep your workspace clear and clutter-free. use small bowls to hold prepped ingredients.
It'll keep your workspace neat and your mind focused. safety is the unsung hero here too—remember to wash your hands, keep your knives sharp, and mind your oven’s heat, which should clock in around 350° f ( 175° c) for those cookies.
Step-by-Step Process
Now, let’s break it down into a step-by-step process. Picture this: You’ve got all the ingredients set and a clear path ahead. Here’s a short, numbered list of what to do:
- Preheat your oven to 350° F ( 175° C) .
- Mix your dry ingredients (flour, baking soda, spices, etc.) and set aside.
- Cream together your butter and sugars until fluffy—this gets you those soft buttery cookies !
- Add your eggs and vanilla. Whip it up!
- Combine dry and wet ingredients, then fold in your nuts and sprinkles. We’re getting festive here!
- Chill the dough for 1 hour to help the flavors meld.
- Roll it out and cut shapes or scoop balls onto your baking sheets.
- Bake for 10- 12 minutes until the edges are lightly golden. Keep an eye on them!
- Finally, let them cool before transferring to your favorite vintage cookie jar .
Expert Techniques
Want to kick it up a notch? Here are some expert techniques to nail those cookies:
- Always check your oven temperature . An oven thermometer can save you from burnt or undercooked cookies.
- Trust your instincts! Use visual cues for doneness—look for golden edges but soft centers.
- And if things go south? Don’t sweat it! For too-hard cookies, a sprinkle of water and a quick reheat can work wonders.
Success Strategies
Now, let’s chat about those success strategies . For instance, a common mistake is overmixing! When you combine wet and dry ingredients, mix just until combined. No one wants tough cookies, right?
Also, make-ahead options can save your sanity during the busy holiday season. dough can be frozen; just wrap it up and store it for later.
Next time the cookie craving hits, you’ll have that chilled cookie dough on standby. ah, the sweet life!
Final Thoughts
Mastering these professional cooking methods can make your holiday baking a breeze. whether you’re whipping up spiced cookie recipes or creating traditional holiday treats , staying organized and knowing your timings will lead to delicious outcomes.
Trust me, when those cookies come out looking perfect, and you get to pack them away in that pretty vintage santa cookie jar , it feels like winning the baking lottery!
Stay tuned for some additional information about cookie decorating ideas and more tips to make your holiday cookie exchange a hit. Happy baking, friends!
Sweet Secrets to Vintage Santa Cookie Jar Cookies
Oh my gosh, if you’re like me, your vintage santa cookie jar isn't just décor; it's a treasure chest of holiday memories! when i roll out these vintage santa cookie jar cookies , i'm instantly transported back to my grandma's kitchen, where the smell of holiday baking filled the air.
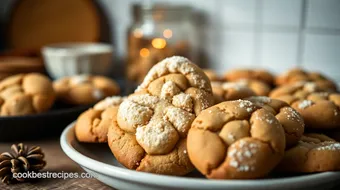
These cookies are soft and buttery, with hints of warm spices and a sprinkle of colorful joy. let’s dig into the goodies behind this recipe, shall we?
Pro Tips & Secrets
So, first things first— time is your friend here! chilling the dough for at least an hour really makes a difference.
It allows the flavors to meld and keeps those little dudes looking beautiful when baked. you don't want flat cookies that resemble pancakes now, do ya?
Flavor enhancement can be as easy as tossing in an extra dash of cinnamon ( totally worth it ) or swapping out your vanilla extract for some almond extract for a nutty twist.
Trust me; it makes ‘em sing in your mouth!
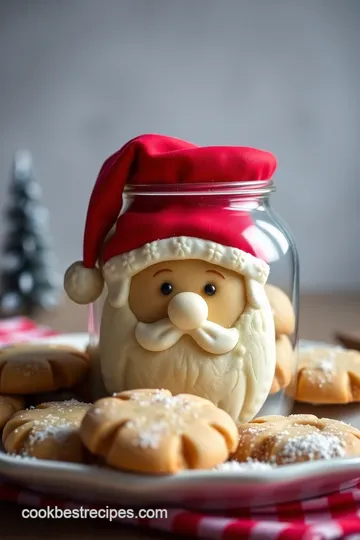
When it comes to presentation , i’ve got a couple of tricks up my sleeve. try arranging the cookies in layers within your vintage cookie jar.
It adds height and looks fantastic! you can even place a fun festive decoration—think little vintage santa decorations —on top for that extra charm.
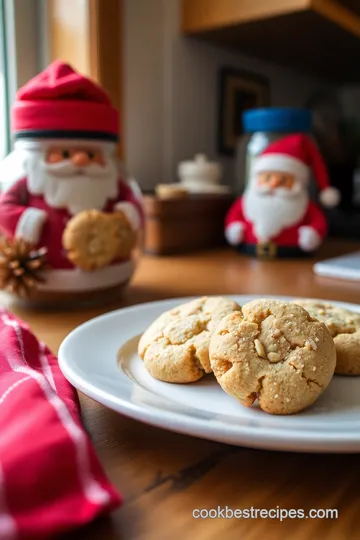
Perfect Presentation
Alright, let’s chat about making these cookies look even more scrumptious. when you’re plating these cookies, consider using vibrant color combinations .
Picture this: a plate with pastel greens and reds from the sprinkles, nestled amongst golden brown cookies. talk about a visual fiesta!
Texture is everything, so don’t be afraid to use a fork or a pastry cutter to make those charming patterns on top.
And hey, toss on some colorful sprinkles right before baking—they’ll melt down but still look fab!
Storage & Make-Ahead
Now, we all want these cookies to last through the holiday chaos, and they absolutely can! store them in an airtight container at room temperature, and they’ll stay fresh for about a week.
Want to make them ahead? chilled cookie dough is an option, too! scoop and freeze the dough balls, then bake them straight from the freezer—just add a couple extra minutes.
Creative Variations
Feeling adventurous? spice things up with some unique cookie flavors ! swap out the nuts for crushed peppermint candies for a cool winter twist, or toss in some egg nog cookies flavoring for that festive nostalgia.
If you're looking for nut-free cookie options , consider subbing those nuts with chocolate chips or dried fruits.
Different seasons call for different sparkles. In the fall, try adding pumpkin spice; in the summer, make them light and bright by incorporating citrus flavors.
Complete Nutrition Guide
Now, i know what some of you might be thinking: “how do these fit into my diet?” good news, folks! each cookie has about 150 calories , with just the right balance of butter, sugar, and those crunchy bits of joy.
Add some whole grain flour for a nutty boost and feel good about indulging in these classic holiday treats .
Expert FAQ Solutions
Got questions? you’re not alone! one common issue is cookies that spread too much. remember, making sure your dough is chilled is key.
Make sure your oven is correctly preheated before baking, so those cookies rise just the way they’re meant to.
If your cookies come out too dry, it's likely an overbaking situation. Keep a keen eye on those edges—just a light golden hue is what you're aiming for.
A Sweet Conclusion
Baking these vintage santa cookie jar cookies isn’t just about the end product. it’s about sharing these moments with family and friends—whether it’s a cookie exchange or just cozied up by the fire.
With a little creativity and those pro tips, you’ll have a new holiday tradition on your hands, filled with sweet holiday snacks and nostalgic cookies to fill your vintage cookie jar.
So lace up those aprons, gather your friends and family, and dive into the joy of holiday baking . you’ve got this!
Vintage Santa Cookie Jar Cookies Card
⚖️ Ingredients:
- 2 ¾ cups (345g) all-purpose flour
- 1 tsp baking soda
- 1 tsp baking powder
- ½ tsp salt
- 1 tsp ground cinnamon
- ½ tsp ground nutmeg
- 1 cup (227g) unsalted butter, softened
- 1 cup (200g) granulated sugar
- ½ cup (100g) packed light brown sugar
- 2 large eggs
- 1 tsp vanilla extract
- 1 cup (150g) chopped pecans or walnuts
- 1 cup (150g) colorful holiday sprinkles
🥄 Instructions:
- Step 1: In a mixing bowl, whisk together flour, baking soda, baking powder, salt, cinnamon, and nutmeg. Set aside.
- Step 2: In another bowl, cream butter, granulated sugar, and brown sugar until light and fluffy.
- Step 3: Add eggs one at a time, mixing well after each addition, then stir in vanilla extract.
- Step 4: Gradually add the dry ingredients to the wet mixture. Mix until just combined.
- Step 5: Gently fold in chopped nuts and half the sprinkles.
- Step 6: Wrap the dough in plastic wrap and refrigerate for at least 1 hour.
- Step 7: Preheat the oven to 350°F (175°C) during the last 15 minutes of chilling.
- Step 8: Roll out dough on a floured surface or scoop tablespoon-sized balls. Place on prepared baking sheets and sprinkle with the remaining sprinkles.
- Step 9: Bake for 10-12 minutes, or until edges are lightly golden.
- Step 10: Remove from oven and cool on the baking sheets for 5 minutes before transferring to a wire rack.
Previous Recipe: Easy Savory Beef Stew in a 10 Quart Pressure Cooker: Comfort Awaits!
Next Recipe: How to Make Easy Slow Cooker Hobo Casserole: A Family Favorite!