Classic Sugar Cookies with Sprinkles
Wondering what age group can make a sugar cookie with sprinkles? Discover kid-friendly baking tips and techniques for delicious treats! Learn more.

Have you ever wondered why sugar cookies manage to evoke that warm, fuzzy, child-like nostalgia, regardless of your age? it’s like biting into a soft cloud of sweetness transports you right back to carefree days spent baking in the kitchen with family or friends.
You know, those moments where flour seems to get everywhere —your nose, the countertops, and god forbid, your hair! trust me; this recipe for classic sugar cookies with sprinkles is not just another passable cookie recipe; it’s a heartfelt invitation to create cherished memories in your kitchen.
You can whip these up in about 30 minutes , which includes all the chopping and waiting around for the cookies to cool (patience is a virtue, right?).
And the best part? this recipe is easy enough that even the little ones can help out. you might be asking, "what age group can make a sugar cookie with sprinkles?" honestly, anyone from toddlers to pre-teens can join in on the fun! it’s a fantastic way to introduce kids to baking, making it a family-friendly activity without getting too complicated.
Now, let's chat about what makes these cookies extra special . for one, the classic combination of butter and sugar, with just a hint of vanilla and almond flavors, makes each bite a delightful experience.
The sprinkles aren’t just for show, either; they add that extra touch of joy that turns these cookies into festive creations, perfect for parties or holiday gatherings.
There's something inherently cheerful about colorful sprinkles that can brighten up even the gloomiest of days.
Historically speaking, sugar cookies have been around since the 1700s, paving the way for family baking traditions that have lasted generations.
Originating from the settlers who brought their baking skills to america, sugar cookies morphed over time but kept their heart—and flavor—intact.
Today, they're a staple at christmas time, birthday parties, or just because —a timeless recipe that continues to be a hit.
When it comes to baking, there’s almost a dance to it, don’t you think? a bit of mixing here, a sprinkle (pun intended) of laughter there.
One of my favorite memories was making these cookies with my niece. we flour-coated each other trying to cut out perfectly shaped cookies.
Spoiler alert—most of them ended up in the undeniably unique category of shapes. perfection? not really, but the giggles and flour fights were absolutely worth it.
Trust me when i say, this version is foolproof.
So, why will you absolutely adore my take on sugar cookies? first, the unique flavor combinations make them stand out.
Second, i promise you’ll nail the techniques every single time, no matter your cooking level. this isn't something only reserved for the "top chefs" of the world.
Additionally, i've included some time-saving tips that will have you in and out of the kitchen before you know it—like using pre-made baking sheets or investing in a good cookie scoop.
On the health and nutrition side, while cookies aren’t typically seen as “health food,” these sugar cookies can offer a bit of pleasure without derailing your diet.
With a light balance of good ol' carbs and fat from butter (again, everything in moderation, right?), they can be enjoyed in moderation after a hearty dinner.
Plus, if you're looking for kid-friendly baking recipes, these sugar cookies are a great way to involve children in the kitchen while teaching them about measuring ingredients, mixing, and even some basic baking safety.
Now that you’re excited, here’s a quick dip into what you’ll need for this cookie adventure. you’re looking at just a handful of ingredients—nothing too fancy.
We have all-purpose flour, butter, sugar, a sprinkle of love, and of course, those colorful sprinkles that can turn a simple cookie into a joyous occasion.
The only challenging part? resisting the urge to eat the raw cookie dough—another classic baking memory!
Remember, as you’re pulling all this together, take your time. baking is as much about the process as it is about the end result.
Those little kitchen disasters you might face? they turn into fond stories that you can share over a cup of coffee or while giving advice to the next generation of bakers.
So let’s roll up those sleeves and dive into this delightful journey of baking classic sugar cookies with sprinkles !
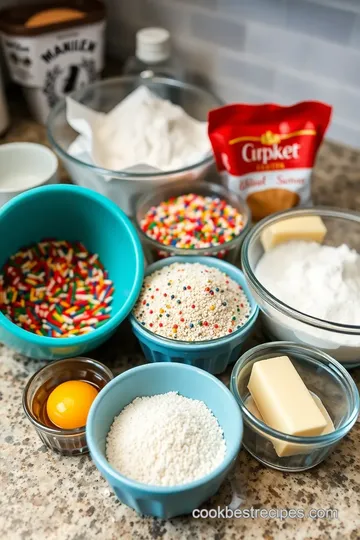
Master Ingredient List
Premium Core Ingredients
First things first, let’s talk about the goodness that goes into these classic sugar cookies with sprinkles. you’re gonna want to gather your premium core ingredients, which can make all the difference.
Here’s what you’ll need:
-
All-purpose flour (2 ¾ cups) : opt for a good-quality flour that has a high protein content. i usually pick up a brand like king arthur.
When measuring, spoon the flour into the measuring cup and level it off with a knife for accuracy. storage tip: keep your flour in an airtight container to fend off any pesky pests.
-
Baking soda (1 teaspoon) and baking powder (½ teaspoon) : these two leavening agents are key to achieving that soft texture we all crave.
To ensure their potency, check the expiration date; they lose effectiveness over time. storage : keep them in a cool, dry place.
-
Unsalted butter (1 cup, or 2 sticks, softened) : ah, butter! the magic maker of all baked goods. by using unsalted, you have total control over the saltiness of your cookies.
When in doubt, try to let it come to room temperature—this helps create that fluffy texture. if you forget, you can place it in the microwave for a few seconds but watch closely—nobody wants a melted butter puddle!
-
White sugar (1 ½ cups) : be sure to use granulated sugar here; the coarser sugar works wonders for adding that crispness.
And trust me, don't be deceived into thinking you can skimp on sugar; it's crucial for sweetness and texture.
-
Egg (1) : For binding and moisture, this little gem is essential. Make sure it’s at room temperature—they mix in better that way.
-
Vanilla Extract (1 teaspoon) and Almond Extract (½ teaspoon, optional) : These flavor enhancers add a delightful aroma! Always go for pure extracts instead of imitation for the best taste.
-
Salt (½ teaspoon) : Don’t skip it! Salt helps enhance the sweetness of the cookies. Quality markers for table salt are usually the fine grains; they dissolve quickly.
-
Sprinkles (¼ cup) : Jimmies, nonpareils, what’s your fancy? Use whatever you love! Just know that the more colorful, the more fun your cookies will be.
Signature Seasoning Blend
You might be thinking, "is this really a seasoning?" well, if it makes my mouth water for cookies, it sure is! the combination of flavor enhancers and lovely aromatic additions like vanilla and almond extract make these cookies unforgettable.
Here’s a tip: don’t be shy with experimenting—try adding a dash of cinnamon for a twist!
Smart Substitutions
If you find yourself in a pinch—maybe you’re baking cookies with kids and suddenly realize you’re out of an ingredient—no worries! Here are a few easy substitutions:
-
Gluten-Free Version : Swap the all-purpose flour for a gluten-free blend. It works well, and believe me, I’ve had plenty of people gobble these up without noticing a difference!
-
Natural Sweetness : If you’re looking to cut back on refined sugar, coconut sugar can step in quite nicely. It gives a slightly different flavor, but, oh, it’s good!
-
Dairy-free option : swap out the butter for a dairy-free alternative like coconut oil or a vegan butter substitute. your cookies might taste a tiny bit different, but they’ll still pack a flavor punch.
-
Seasonal Variations : Think about cranberries or orange zest for a fall twist. These little additions could really shake things up!
Kitchen Equipment Essentials
Now that we've got our ingredients ready, let’s talk tools. Here are the kitchen essentials for whipping up these delightful cookies:
-
Mixing Bowls : You’ll want a good set of mixing bowls, preferably glass, as I always feel they seem to blend things better.
-
Electric Mixer : This is your best friend for creaming the butter and sugar. Sure, you could use a wooden spoon, but your arm might not thank you later!
-
Cookie Scoop : This is optional but highly recommended. It helps form those perfect, uniform dough balls. No more lumpy cookies, yay!
-
Baking Sheets : Line with parchment paper, and your cookies will slide off like a dream later on.
-
Wire Racks : Definitely worth it for cooling your cookies. And trust me, the cookies cool faster this way and taste even better when they’re not in a sweaty pile.
Pro Ingredient Tips
When it comes to selecting your ingredients, a little know-how goes a long way:
-
Butter Quality : Always go for unsalted butter from a brand you trust. Nothing ruins a baking day like rancid butter!
-
Sugar Sweetness : The fresher the sugar, the better the taste. Take care to store sugar in an airtight container to avoid clumps.
-
Egg Temp : It makes a difference! I've had my share of cookies that didn't turn out right because I used cold eggs—big bummer!
What age group can make a sugar cookie with sprinkles?
Honestly, kids of all ages can take part in this fun activity, especially those around the age of 4 and up.
Just be ready for a few flour fights or maybe a sprinkle explosion! it’s more about the joy of baking together than being perfect, right?
So there you go! Now that you’re armed with all this ingredient info and kitchen wisdom, it’s time to don your aprons and get that cookie baking adventure started! Happy baking, friend!
Foolproof Cooking Steps
Making classic sugar cookies with sprinkles is an absolute delight, especially when you’ve got little hands helping you out in the kitchen.
Trust me, there’s nothing quite like the excitement on their faces as they mix and sprinkle—all while learning a thing or two about baking.
Now, let’s dive into those foolproof steps that will have your cookies coming out perfectly every time!
Essential Preparation Steps
First things first: mise en place , or getting everything ready! you don't want to be scrambling for ingredients when you're elbow-deep in dough.
Gather your flour, sugar, butter, egg, and sprinkles. here’s a tip: measure out your ingredients before starting. it makes the whole process smoother and keeps the chaos at bay.
We’ll also do some light prep here, like softening your butter. plop it out of the fridge at least 30 minutes before you begin—this makes it easier to cream.
As for time management, let’s keep our timing tight. we’ve got a total of about 30 minutes (including cooling), so let’s use that wisely! grab a couple of baking sheets and line them with parchment paper—this helps with easy cookie removal later.
Organization is key! i like to have my baking tools handy: an electric mixer, bowls, and spatulas. and hey, if you’ve got kiddos with you, give them simple tasks! measuring out the sprinkles or rolling the dough into balls gives them a sense of ownership over the project.
Professional Cooking Method
Now that we’re all prepped and ready, here’s the step-by-step process . Preheat your oven to 375°F (190°C)—not too hot, not too cold. Just right for these cookies!
-
First , mix your dry ingredients. Whisk together the flour, baking soda, baking powder, and salt in a bowl. It’s like getting the party started before the guests arrive. Set this aside.
-
Next , in a large bowl, cream together your softened butter and sugar for about 3-5 minutes. You’re aiming for light and fluffy—think clouds, not bricks!
-
Now, add the egg and vanilla extract. Mix until well combined. If you're feeling fancy, toss in some almond extract for extra flavor—totally optional though!
-
Combine those dry ingredients with the wet mixture slowly. keep the mixer on low. this is where patience pays off; we don’t want to overmix, or your cookies might end up tough instead of tender.
-
Lastly , gently fold in your sprinkles—it’s like giving your cookie dough a little party—everyone loves sprinkles!
Expert Techniques
A few expert techniques can really help take your cookie game to the next level:
-
Scoop the dough using a cookie scoop or two spoons. Aim for about 1.5 tablespoons to keep them uniform in size. This way, you avoid uneven baking!
-
Timing is crucial ! bake for 10-12 minutes. watch for lightly golden edges and set centers. the cookies will puff up but will flatten as they cool.
When they start to look like perfect little discs, it's time to follow your instincts and pull them out!
-
About cooling: Allow those beauties to sit on the baking sheet for five minutes—this lets them firm up before you transfer them to wire racks.
Success Strategies
Now, what if things don’t go as planned? here are some troubleshooting tips to ensure success. if your cookies come out flat, maybe the butter was too warm or you mixed too much.
Remember not to skip the chilling process if you can help it.
Storage is also crucial. pop your cookies in an airtight container at room temperature, and they should last around a week.
Feel free to freeze them too—however, baking with sprinkles is often a favorite activity for kids, especially if you’re making cookies for parties or just because!
So, what age group can make a sugar cookie with sprinkles? honestly, kids as young as four can help out with simple tasks under supervision.
Just be sure to keep an eye out for those sneaky sprinkles—they have a tendency to end up in little mouths instead of on cookies!
Remember, baking is all about having fun, and even if things go awry, you still get to eat your mistakes! Happy baking, friends!
Master Chef's Advice
When it comes to baking sugar cookies, especially with sprinkles, I've picked up a few tips along the way—mostly from trial and error! So, let's spill the beans, shall we?
Professional Insights
First off, don't feel like you need to rush. baking is a science , but it’s also an art meant to be enjoyed.
Take your time while mixing ingredients; i’ve learned that a good mix can mean the difference between a chewy delight and a dry disappointment!
Expert Techniques
Creaming the butter and sugar is crucial. if you're like me and get a bit impatient, trust me, give it that full 3-5 minutes.
It’s worth every second. i once rushed it, and let’s just say the cookies came out... well, let’s just say they weren’t my best work.
Kitchen Wisdom
And, a hot tip: always preheat your oven . it's like warming up before a workout—your cookies will thank you later! and when they go in, keep an eye on them.
They take just 10-12 minutes, and it’s way too easy to lose track of time scrolling through instagram instead of watching those beauties bake.
Success Guarantees
Lastly, if all else fails, remember: even the ugliest cookies can taste divine. If they don’t look perfect, they still have a home in my tummy!
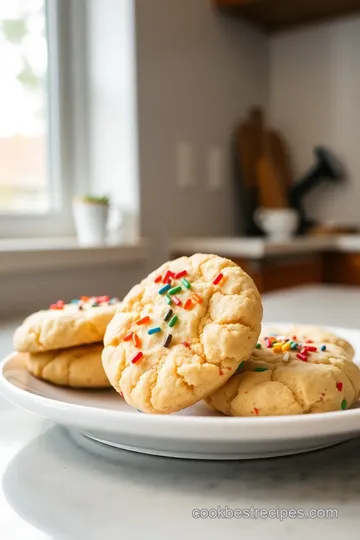
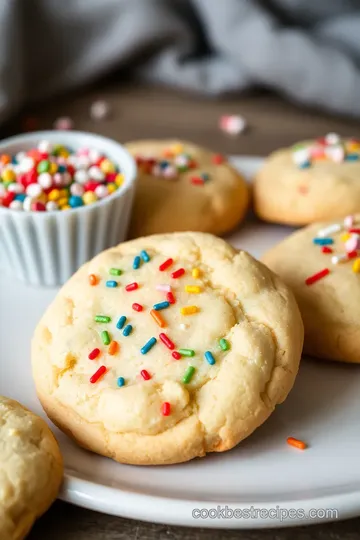
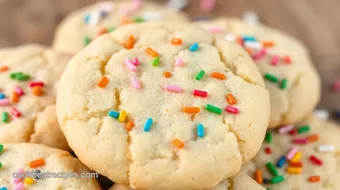
Perfect Presentation
Now, let’s talk aesthetics because, come on, don’t we all eat with our eyes first?
Plating Techniques
For these sugar cookies, i like to arrange them on fun-colored platters—gives a nice pop and makes you want to dive in! picture a gentle mountain of cookies surrounded by confetti-like sprinkles—it’s hard to resist.
Garnish Ideas
You could also sprinkle a bit of powdered sugar on top for that snowy effect. It’s like a fairy dusting that takes them from ordinary to extraordinary in seconds.
Serving Suggestions
These cookies are perfect served plain or with a glass of milk for the kiddos. If you want to get fancy, a scoop of vanilla ice cream on top makes it feel like a party!
Visual Appeal Tips
Don’t forget about the sprinkles! Use a mix of colors to create a fun vibe. Plus, if you put a few extra on top after baking, it really ups the wow factor!
Storage and Make-Ahead
If you want to bake up a storm for a cookie party or just have a stash for when cravings hit, here are some tricks:
Storage Guidelines
Keep your cookies in an airtight container at room temperature so they stay fresh! I use those cute little tins that remind me of my grandma's kitchen—I swear they make the cookies taste even better!
Preservation Methods
You can freeze the dough if you want to prepare ahead. just scoop it onto a sheet, freeze it solid, then toss those dough balls into a freezer bag.
Boom! fresh cookies anytime.
Reheating Instructions
To reheat, pop them in a low oven for a couple of minutes. they will taste just like fresh out of the oven.
I’ve definitely gone to town on the warmed-up version with a splash of milk to wash it down.
Freshness Tips
Always remember: cookies are best eaten fresh. But they’ll hold up nicely for about a week, so eat ‘em up!
Creative Variations
Baking sugar cookies shouldn’t be a one-size-fits-all. Let’s bring in some creativity!
Flavor Adaptations
Want to shake things up? Try different extracts, like peppermint for a Christmas vibe. Just make sure to adjust the amount a smidge since some might be stronger than vanilla.
Dietary Modifications
If you’re baking for a group, consider gluten-free flour or even sugar replacements for those who need it. I once tried coconut sugar; it gave my cookies a nice caramel flavor!
Seasonal Twists
In autumn, toss in some pumpkin spice. When summer rolls around, lemon zest can brighten the cookies up wonderfully.
Regional Variations
Just for fun, you might think about adding some flavors that reflect your heritage. For instance, how about a hint of chai spices if you’re feeling adventurous?
Expert FAQ Solutions
We all have questions when baking, and I’ve been there!
Common Concerns
“What age group can make a sugar cookie with sprinkles?” It really depends on the child. I’ve seen 5-year-olds help and have a blast. Supervision is key, of course!
Expert Answers
Don’t be afraid to let them get their hands dirty. Kids can handle mixing and decorating with just a little adult guidance. It’s educational and oh-so-fun!
Troubleshooting Guide
Did your dough turn out too crumbly? Don’t panic! Sometimes it just needs a splash of milk. I’ve saved many a batch with a little extra moisture.
Success Tips
Relax and enjoy the process. You’ll produce some sweet treats for sure, but the real treasure is those shared moments in the kitchen.
Complete Nutrition Guide
Alright, let’s look at what you’re really indulging in here.
Detailed Breakdown
Each cookie is about 120 calories, which isn’t too crazy, especially considering the joy it brings.
Health Benefits
Got kids around? Baking together can teach them kitchen skills while bonding. Plus, these cookies are just joy in a bite .
Dietary Information
The beauty of cookies is in their versatility. Swap out ingredients to make them work for different diets. Just because you need to watch sugar doesn’t mean you can’t enjoy a cookie.
Portion Guidance
And hey, moderation is key. For me, sharing these cookies is always more fun—and you can stretch the joy further that way!
So there you have it—everything from baking advice to creative twists! these sugar cookies with sprinkles are the perfect excuse to gather friends, family, or even just indulge on your own.
Happy baking!
Classic Sugar Cookies with Sprinkles Card
⚖️ Ingredients:
- 2 ¾ cups all-purpose flour
- 1 teaspoon baking soda
- ½ teaspoon baking powder
- 1 cup unsalted butter, softened (2 sticks)
- 1 ½ cups white sugar
- 1 egg
- 1 teaspoon vanilla extract
- ½ teaspoon almond extract (optional)
- ½ teaspoon salt
- ¼ cup sprinkles (jimmies, nonpareils, or any desired variety)
🥄 Instructions:
- Step 1: Preheat your oven to 375°F (190°C). Line two baking sheets with parchment paper and set aside.
- Step 2: In a medium bowl, combine the flour, baking soda, baking powder, and salt. Set aside.
- Step 3: In a large mixing bowl, using an electric mixer, cream together the softened butter and white sugar until light and fluffy (about 3-5 minutes).
- Step 4: Add the egg, vanilla extract, and almond extract (if using) to the butter-sugar mixture. Mix well until fully incorporated.
- Step 5: Gradually add the dry ingredients to the wet mixture, mixing on low speed until just combined. Be careful not to overmix.
- Step 6: Gently fold in the sprinkles using a spatula, ensuring an even distribution without breaking them.
- Step 7: Use a cookie scoop (about 1.5 tablespoons) to drop rounded balls of dough onto the prepared baking sheets, leaving about 2 inches of space between each cookie.
- Step 8: Bake in the preheated oven for 10-12 minutes or until the edges are lightly golden and the centers are set.
- Step 9: Remove from the oven and allow the cookies to cool on the baking sheets for about 5 minutes, then transfer them to wire racks to cool completely.
Previous Recipe: Slow Cooker Macaroni Comfort Food Delicacy
Next Recipe: Square Langue de Chat Sandwich Cookies Recipe: 5 Easy Steps to Delight!